What’s new and the latest enhancements in Paragon – effective August 3rd, 2022.
Fixed issues
Contacts: Agents can now delete a contact even if a property is associated with that contact.
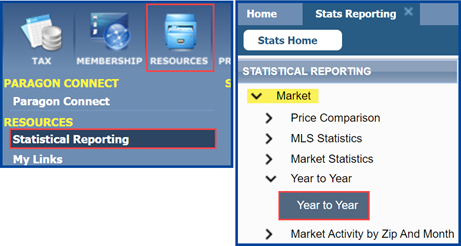
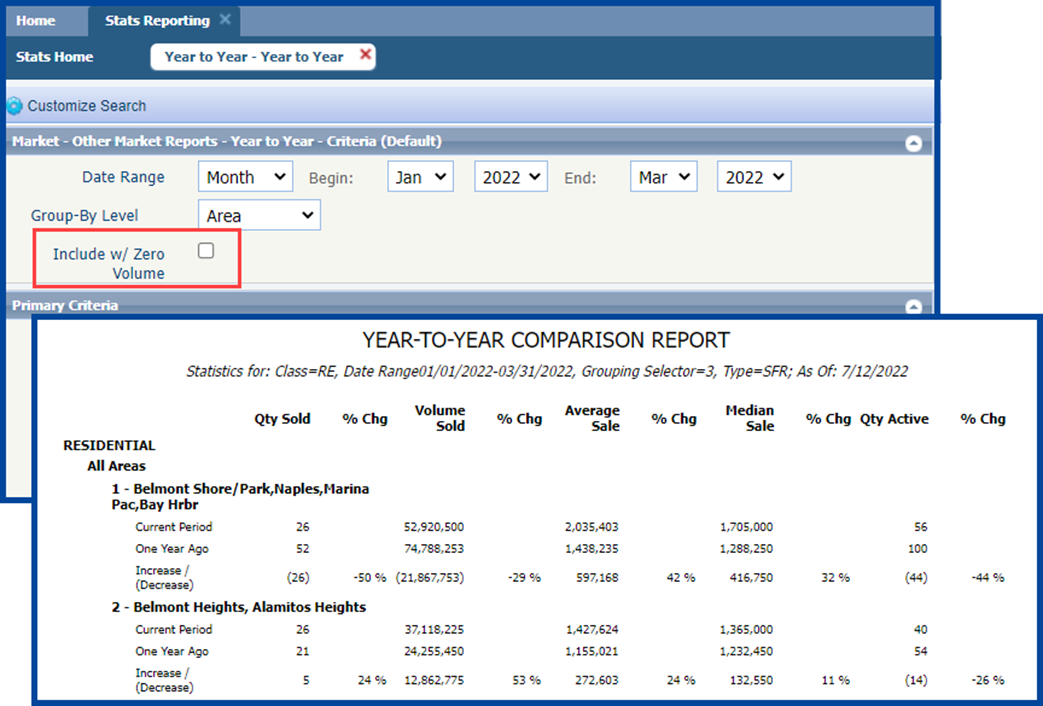
Statistics: We have fixed the Year-to-Year Reports alignment so that it displays correctly.
Paragon desktop enhancements
Broker Attribution – NAR Mandate
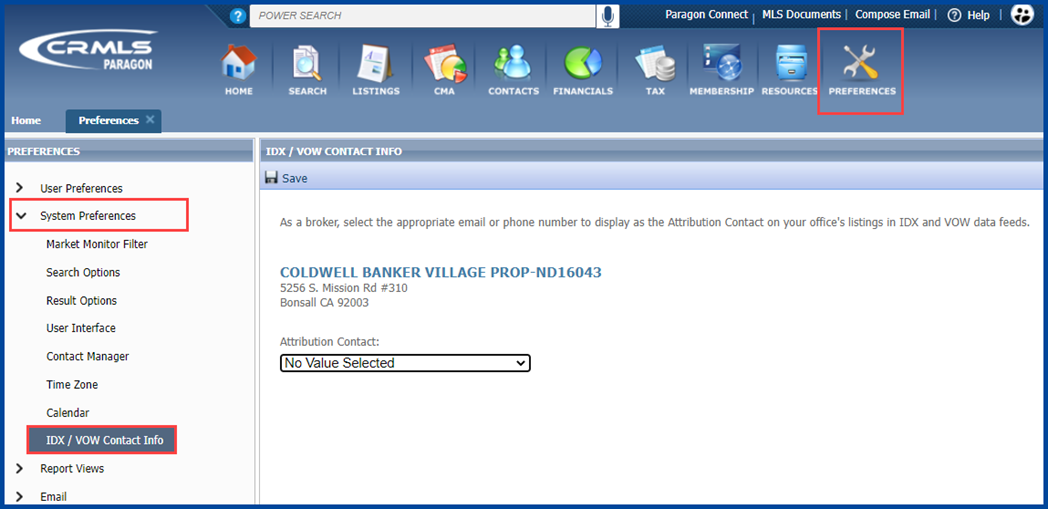
In compliance with the NAR mandate for Broker Attribution, we have added a new option to the Preferences > System Preferences navigation tree for IDX/VOW Contact Info in Paragon Desktop. This addition will allow the broker to select a phone number or email address to display in listings that go out in IDX and VOW data feeds via RETS.
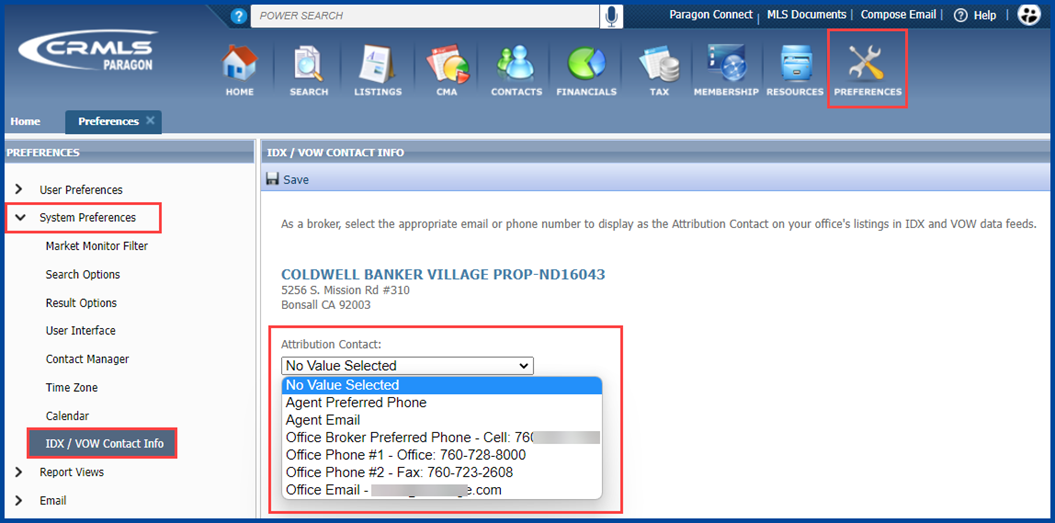
There is a new Attribution Contact drop-down menu, allowing the broker to select from a list of phone numbers and emails. Note that this field is optional, and the broker does not have to set a value. Only security level 5 and higher will have permission to populate this field, and this field can only have one value. The drop-down list includes the following options:
- No value selected
- Agent preferred phone
- Agent email
- Office broker preferred phone
- Office broker email
- Office phone #1 – 3
- Office email
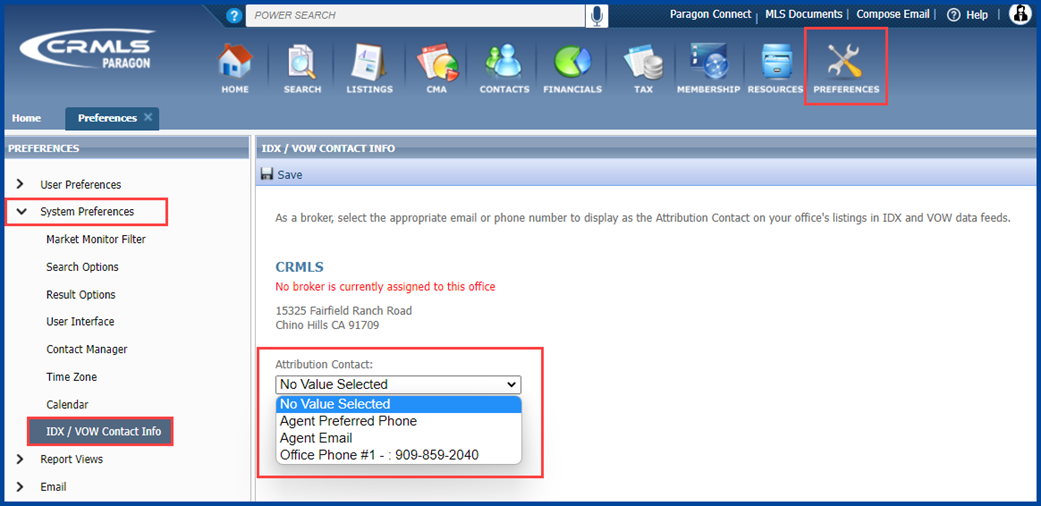
If Paragon does not have any data for any of these options, that choice will not display in the drop-down list. If an office does not have an assigned broker, a message will appear saying, “No broker is currently assigned to this office” and the “office broker preferred phone” and “office broker email” fields will not appear in the drop-down list.
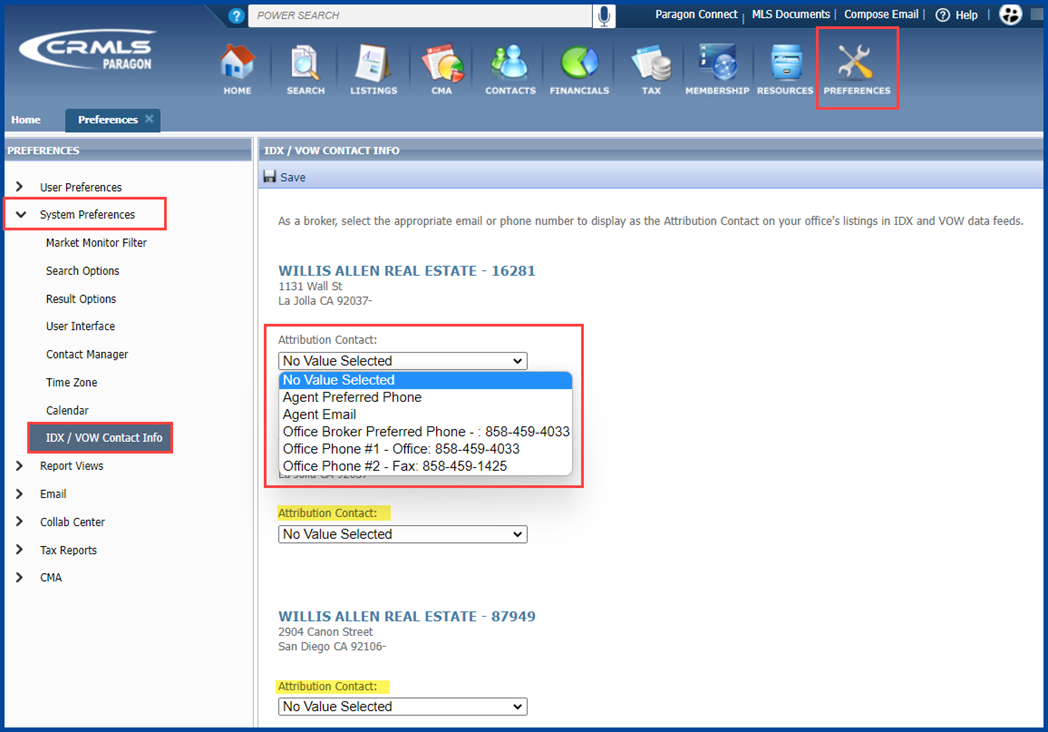
When Paragon assigns a broker to multiple offices, each office will appear with a separate drop-down. The broker will have the ability to set a different value for each office.
The default will appear as “No Value Selected.” Per the mandate, the Listing Participant must select the value, so CRMLS cannot pre-select for the Broker/MLS. Once the broker makes their selection, the actual phone number or email address will appear on outbound IDX and VOW listing data feeds. The field will appear as “AttribContact” in the data feed.
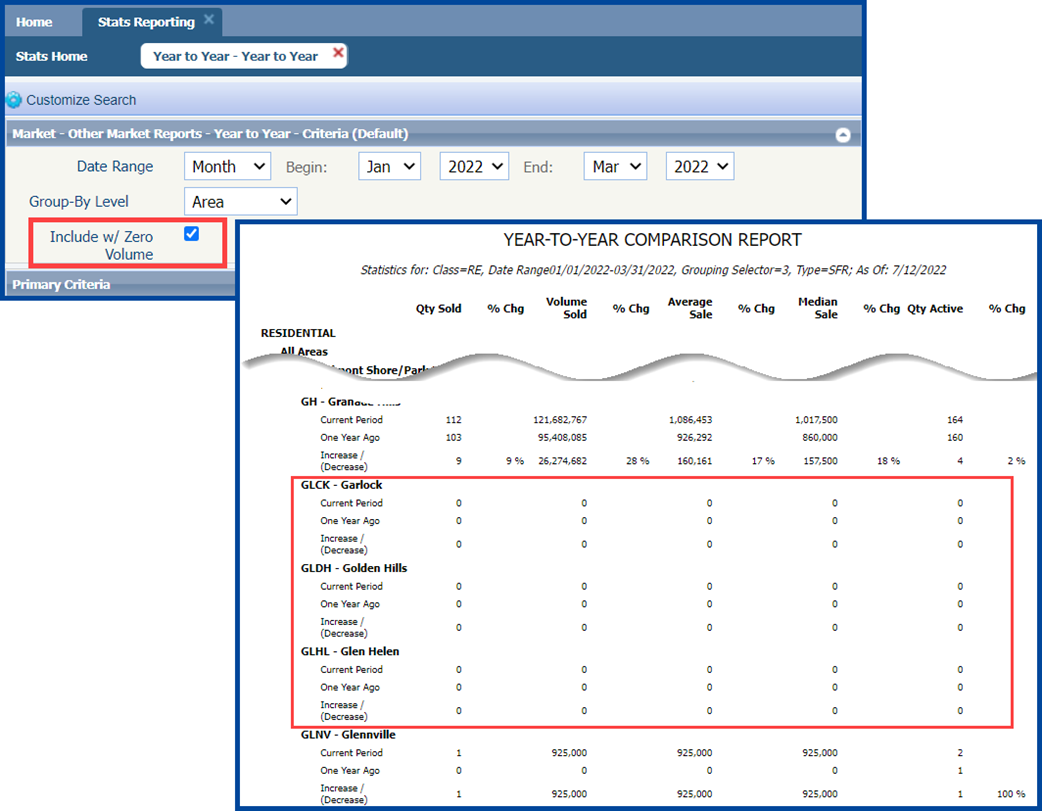
Statistical Reporting – Add Zero Volume filter to Year-to-Year report
The Year-to-Year report can now use the “Include with Zero Volume” filter. When you select this filter, the report will return all results. When you unselect this filter, the report will exclude sections where all columns are zeroes.
Collaboration Center
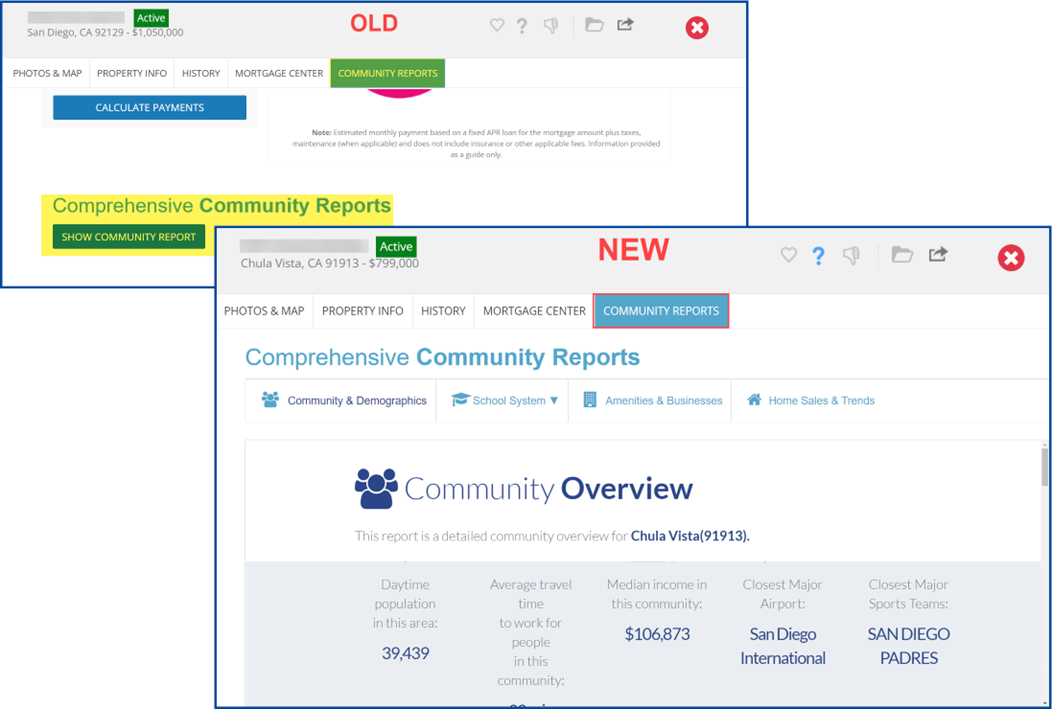
Removal of Show Community Report button
Previously, the CollabLink and Collab Center displayed a Show Community Report button. Consumers would have to click the button to view the report. Now, the report will automatically display when the user clicks the Community Reports tab or scrolls to the bottom of the detail view.
Paragon Connect Enhancements
New Hotsheet
The Hotsheet search in Paragon Connect is completely remodeled and upgraded, with faster results and full synchronization with Paragon Desktop. It even includes new features unique to Paragon Connect. Below are some highlights:
Hotsheet Duration
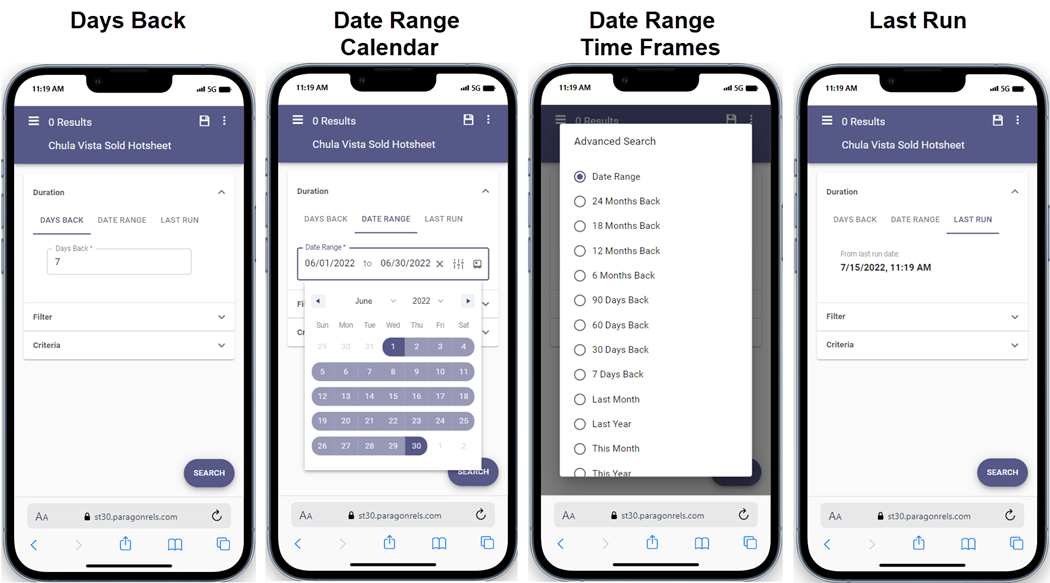
Previously, you could only use a date range to locate hotsheet records in Paragon Connect. Now you have three separate options:
- Days Back: Search for up to 999 days in the past. Note that you can only type in numeric values.
- Date Range: Agents and brokers can still manually type a beginning and end date and can now use a calendar for date range. The new component also allows you to choose from pre-set time frames.
- Last Run: Allows the agent to run a search based on the last time they ran the displayed Hotsheet search. This is slightly different from Paragon Desktop, which will use the last run date for all saved Hotsheet searches.
Hotsheet Filter
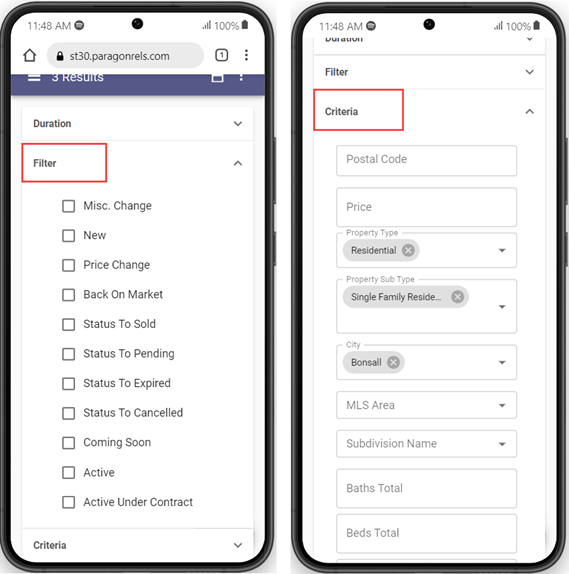
The Hotsheet Filter now has the same types and statuses found in Paragon Desktop and allows you to filter by specific types of Hotsheet records.
Hotsheet Criteria
The Hotsheet “Criteria” container now has the same fields used in your Paragon Desktop. These will bring you even more filtering capabilities.
Hotsheet Results
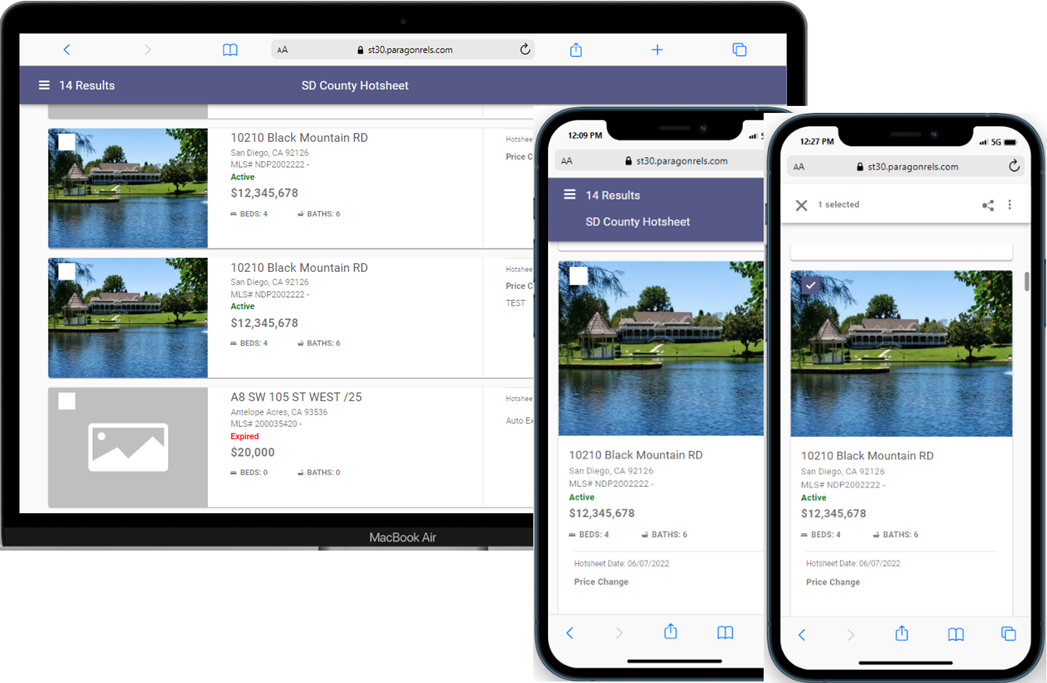
The updated thumbnail results view now includes the Hotsheet update date, status/type, and any Hotsheet comments.
We’ve introduced advanced coding that speeds up response times in your search. In addition, these searches no longer have a 500-listing limit. You can select any one or more of these listings and share them via email, text, Facebook, Twitter, copying the link, etc. You can also add listings to a cart, get driving directions, or access third-party integrations.
Save Hotsheet Search
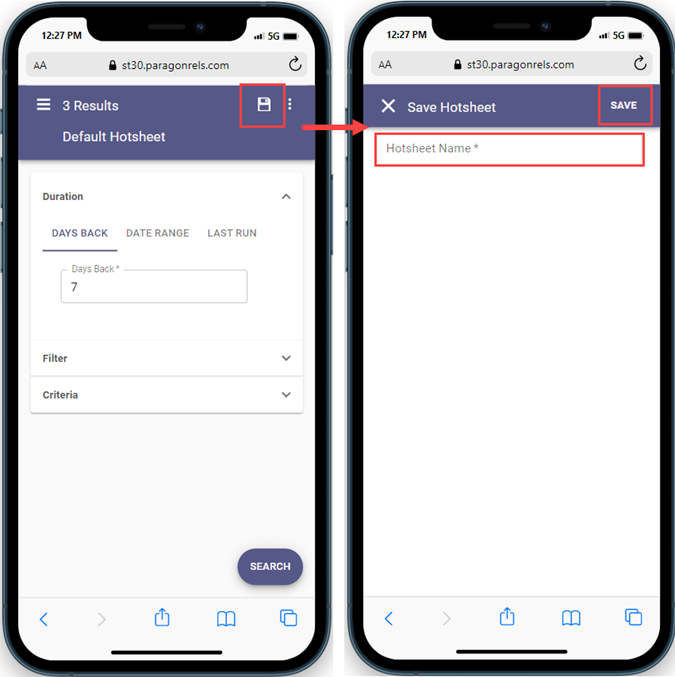
You can now save, find, and edit Hotsheet searches across both Paragon Desktop and Paragon Connect.
Tap on the Save icon and name the Hotsheet. If you are on the default Hotsheet template, Save will create a new Hotsheet search. If you load an existing saved Hotsheet, Save will save any changes you made to that Hotsheet.
Hotsheet – Update Default Template
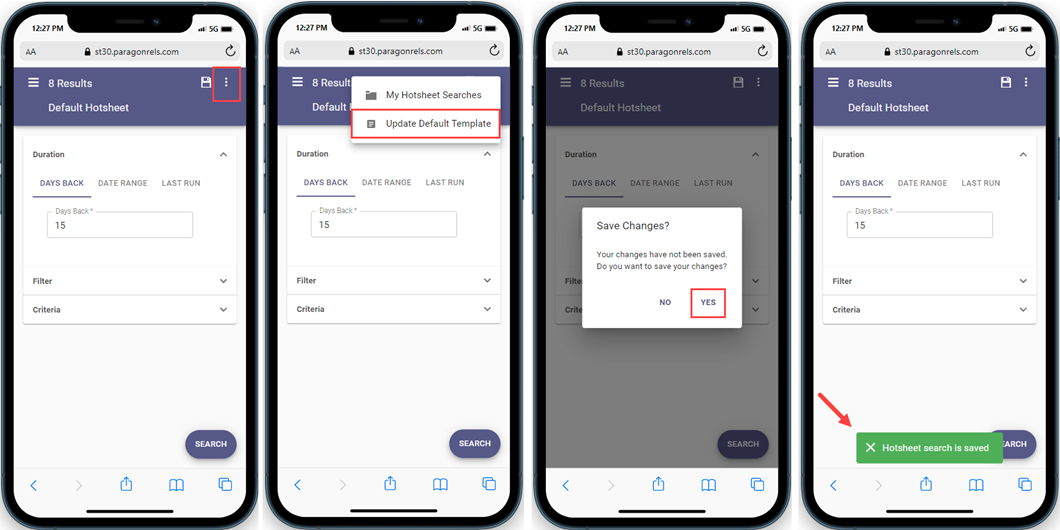
You can now update your default Hotsheet template. This allows you to retain the criteria you want each time you load the Hotsheet search module.
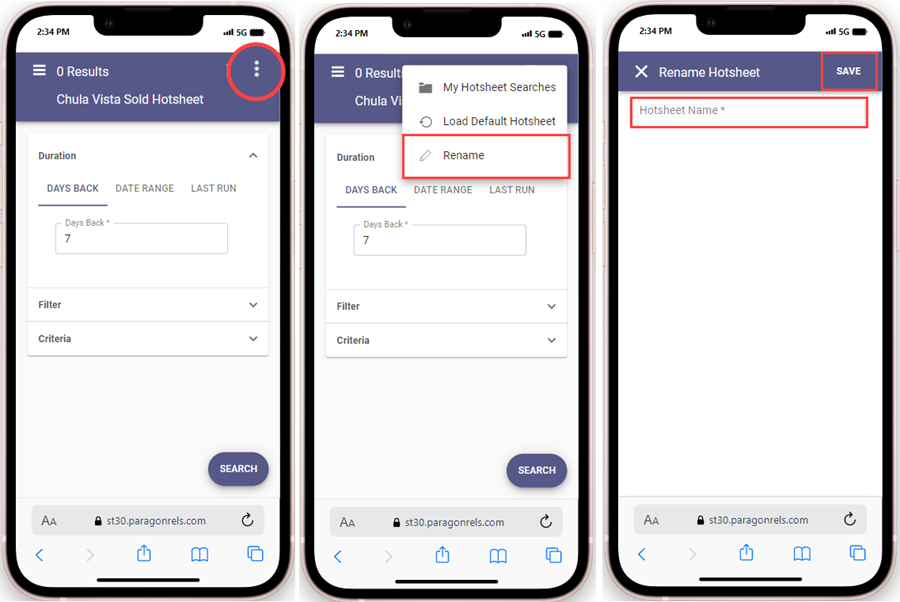
To update the template, make your changes, then tap the overflow menu (three dots) in the upper right corner, and select Update Default Template. After you confirm this request, your Hotsheet will load with your new default criteria.
Load Hotsheet
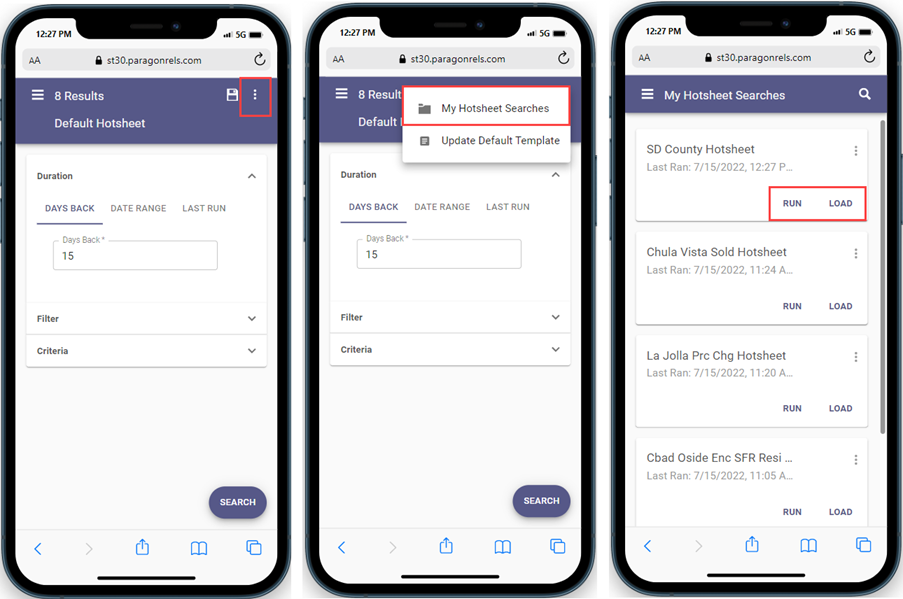
To load a Hotsheet, tap the overflow menu (three dot) in the upper right corner, and select My Hotsheet Searches. You will see a list of your Hotsheet cards.
The Hotsheets sort by last run time and contain two links:
- Run – This runs the search and takes you to the thumbnail results view.
- Load – This will return you to the Hotsheet search form and load the saved criteria for this Hotsheet search.
Delete Hotsheet
To delete a Hotsheet, tap the overflow menu (three dots) in the upper right corner of the Hotsheet card, select Delete, and then select Delete again. Once you confirm the request, the system removes the Hotsheet, and all other cards move up in the order.
Hotsheet Alerts
Hotsheet Alerts is a brand-new feature unique to Paragon Connect. This will show a notification when new matches appear since the last time you ran a specific hotsheet search. You can enable alerts for up to five Hotsheets.
Adding Alert
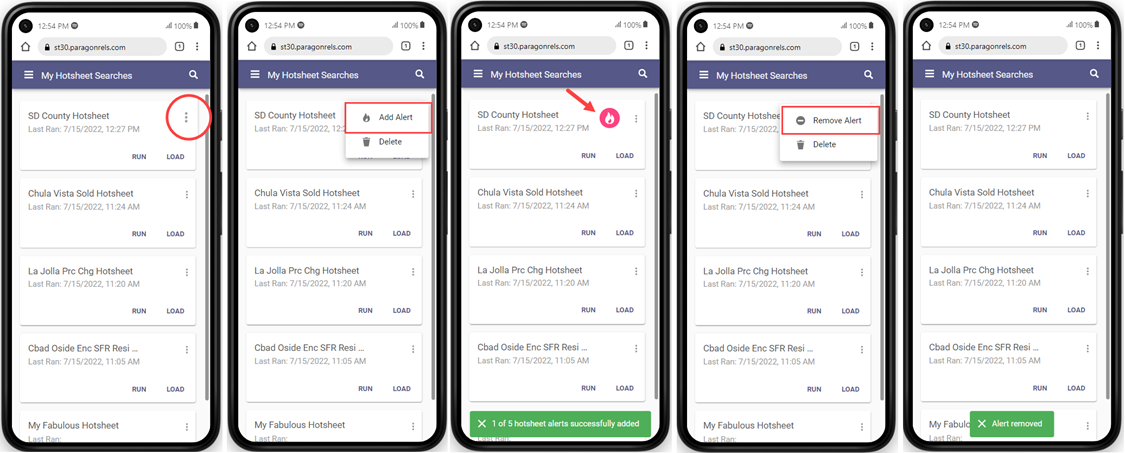
To add an alert, tap the overflow menu (three dots) in the upper right corner on any saved Hotsheet search, and then tap Add Alert. This will add a new “pink fire icon” on the card to indicate that you’ve added an alert.
Removing Alert
To remove the alert, tap on the overflow menu and then select Remove Alert. This will remove the alert and the pink fire icon on the card.
Homepage Alerts for Hotsheets
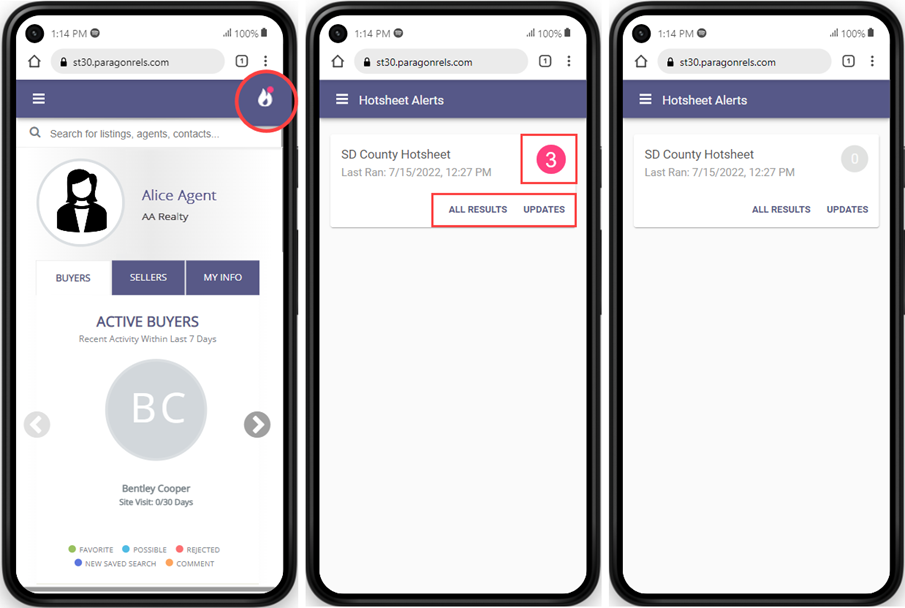
You’ll notice a new fire icon on the homepage’s top bar. This will monitor any updates to Hotsheet alerts.
A “pink badge” above the fire icon indicates there are new updates. Tapping on the icon will take you to the Hotsheet Alerts page, where you can see all your saved alerts.
Whenever there are new updates, a “pink circle” with the number of updates will display on any saved alert card. (Note: at this time Paragon Connect does not email or send out Hotsheet alerts.) You will see two links at the bottom of each card:
- All Results: This will take you to thumbnails of all the records found with this saved Hotsheet.
- Updates: This will take you the thumbnail results but will only show new Hotsheet records since the last ran date.
Once you have viewed your updates, the circle count grays out and revert to zero.
Load Default Hotsheets
The Hotsheet overflow menu will have different options depending on which type of Hotsheet you are looking at. When viewing a saved Hotsheet search, the menu will have Load Default Hotsheet. Selecting this allows you to revert the Hotsheet back to the default search.
Rename Hotsheets
Another option that only appears while viewing a saved Hotsheet is the Rename option. You can use this to rename your saved Hotsheets.
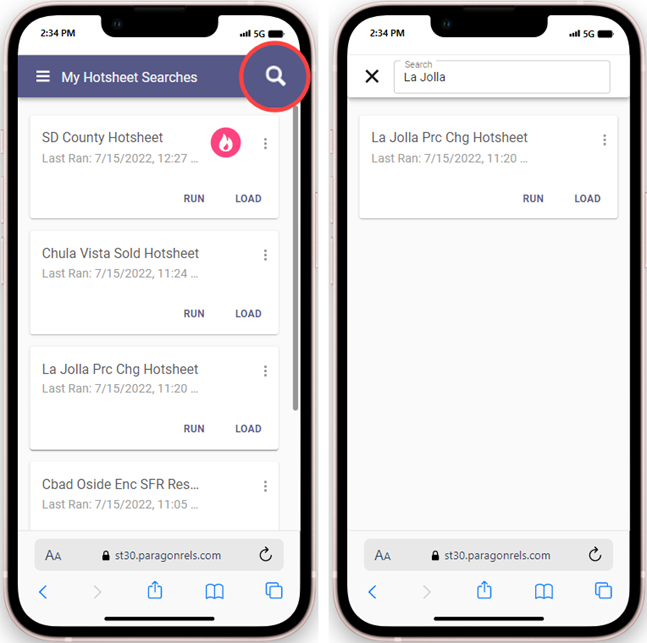
Search Hotsheets
When you load a Hotsheet search, you will notice a Search icon on the top app bar. Use this feature to find any Hotsheet search you’ve created.
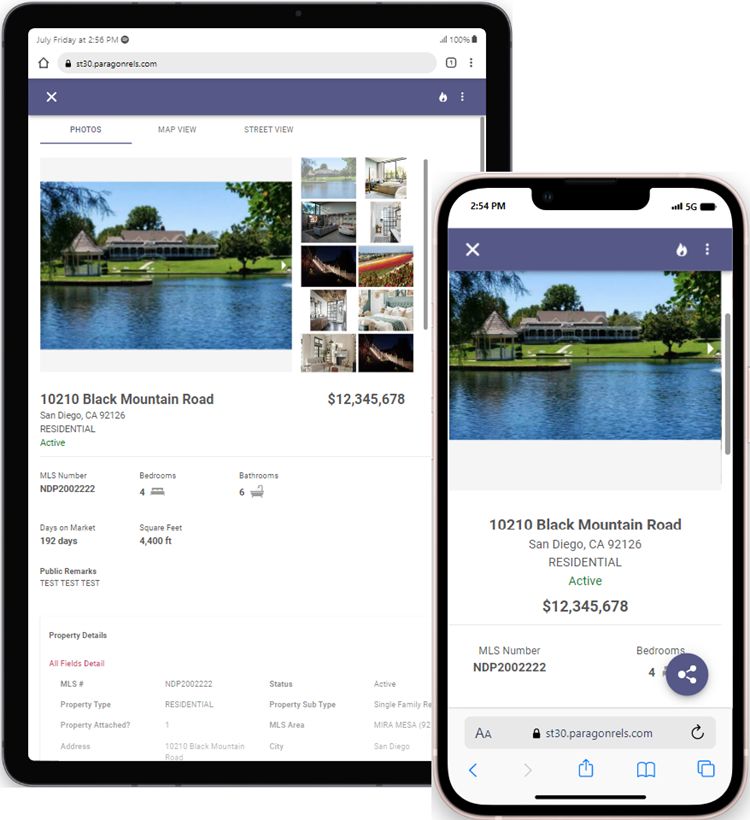
New Listing Detail Report
The new high performing detail report has replaced the old Paragon Connect detail report throughout the following areas in Paragon Connect:
- Property Class Search
- My Location Search
- Open House Search
- Hotsheet Search
- Power Search
- Single bubble count on active buyer on the dashboard
- Seller’s tab on dashboard
- Comments on dashboard
- My Info Page
- My Listing Carts
You will soon see an updated Connect View in Paragon Desktop as well.
Open House Creation/Management Feature
This enhancement allows the listing agent to easily create and manage open houses from the Listing Input Module on any device. All Open House features are listed below.
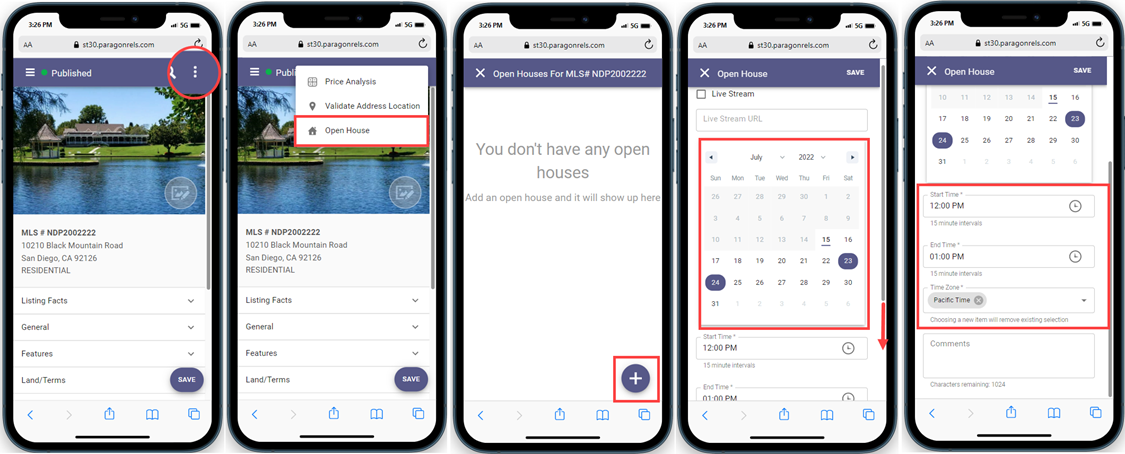
Accessing the Menu
Access the open house feature by clicking the overflow menu on the “Listing Edit” screen, and then click Open House.
Creating an Open House
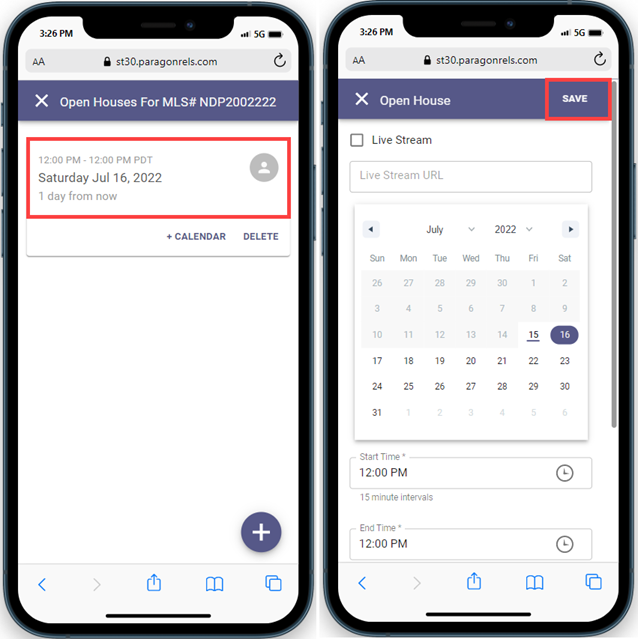
To create an open house, click on the plus sign icon in the bottom right corner. Select the Date(s), Start/End Time(s), and the appropriate Time Zone from the drop-down list. These are required fields.
Add Comments and Save the Open House
Add optional comments, up to 1024 characters. Make sure all the information is correct, and then click Save. You will see the Open House management page.
Edit an Existing Open House
From the Open House management page, click or tap on an existing open house card, make the necessary changes, and select Save when finished.
Deleting an Open House
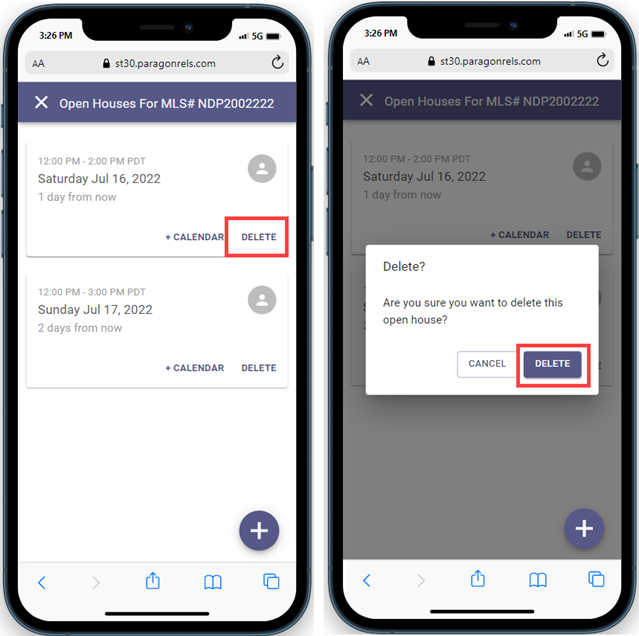
Click the Delete icon. Confirm you want to remove this open house, and then click Delete again.
Adding to your Device Calendar
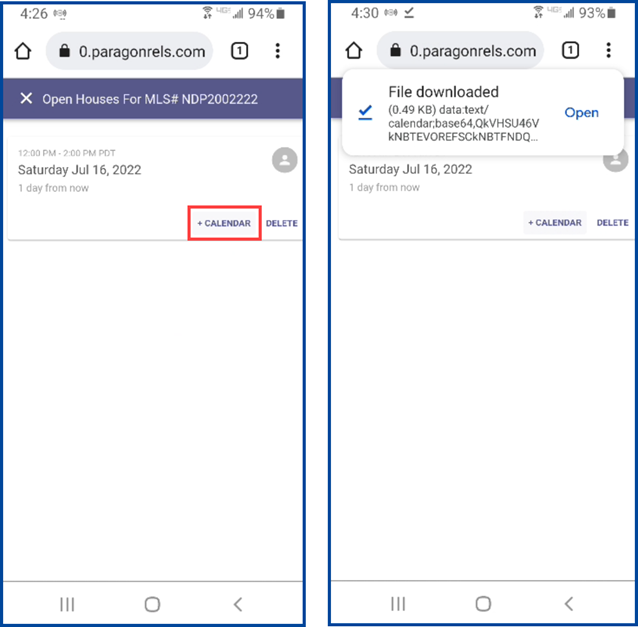
Add an open house to your device’s default calendar by clicking the + Calendar button and saving it to your calendar.
Listing Maintenance Module
This new feature allows you to access and maintain your published and unpublished (or partial) listings and add new listings!
Listing Menu
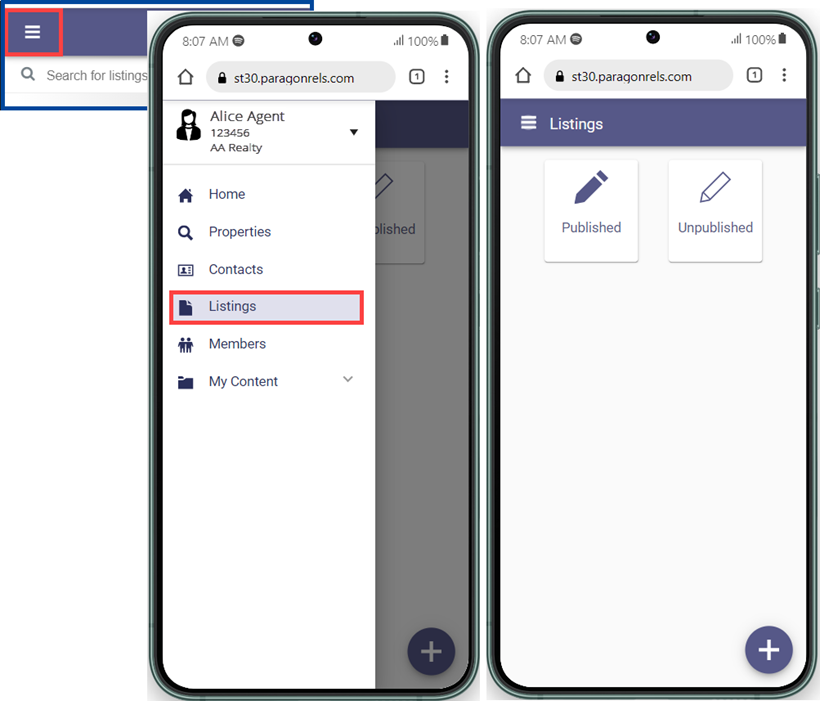
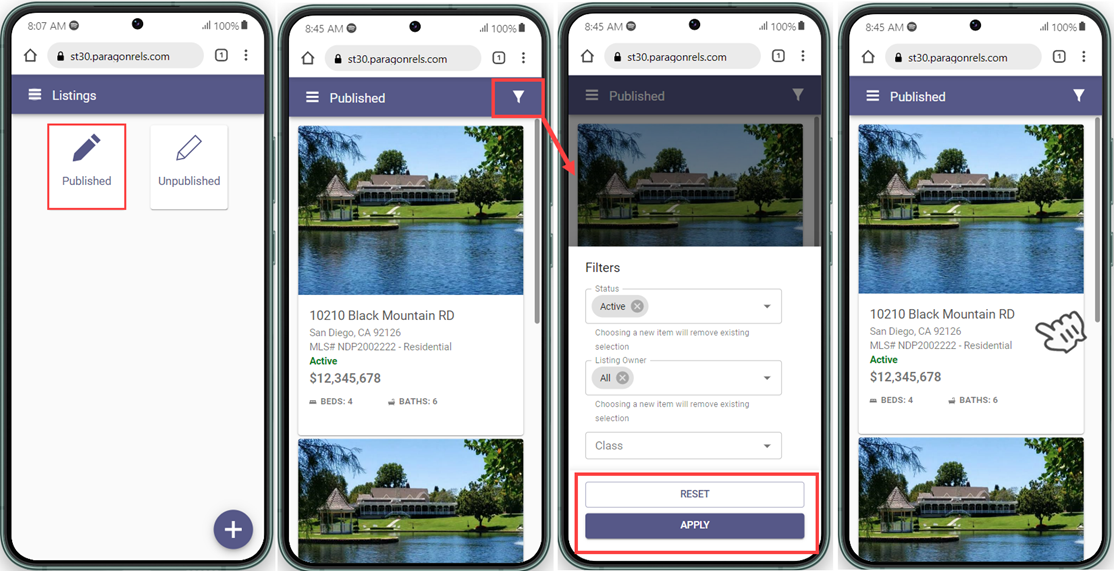
If you have listing maintenance permissions, your “hamburger” menu in the upper left corner will include a new Listings option. The new Listings page allows you to access all your Published or Unpublished (known as Partials in Paragon Desktop) listings. Paragon Connect uses these new labels to make it easier to distinguish between completed and uncompleted listings.
Published Listings
Select Published for a thumbnail view of all your listings. The filter option in the top right corner allows you to sort listings by Status, Listing Owner, or Class. Click Apply to see the filtered results or Reset to ignore.
Tap on the listing to open it, modify any field, and perform additional actions.
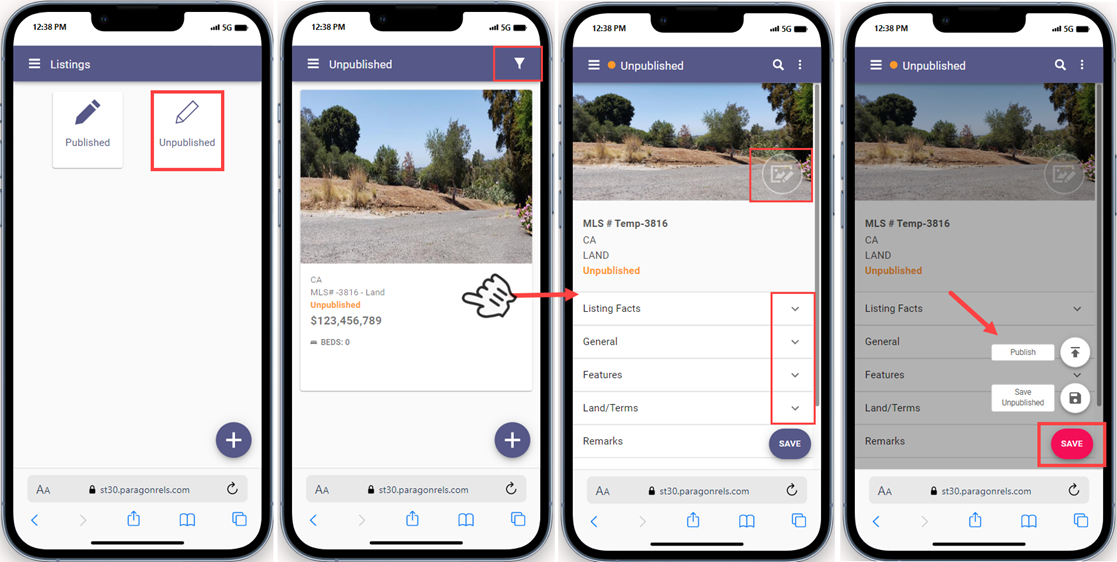
Unpublished Listings (Partials)
Unpublished listings do not have the required details needed to be a published, or “live,” listing.
Select Unpublished for a thumbnail view of all your listings. The filter option in the top right corner allows you to sort listings by Listing Owner or Class. Click Apply to see the filtered results or Reset to ignore.
Tap on the unpublished listing to open and edit it and to upload photos. When you have completed the required fields, select Save and choose to Publish as a live listing, or Save Unpublished to save your work and continue input later. The same business rules and requirements in Paragon Desktop apply in Paragon Connect.
