In certain circumstances, you may enter a listing in the MLS as a comparable, or “comp.” Having this data in the MLS helps you and other real estate professionals determine pricing and see property history, improving the dataset and overall accuracy of the MLS.
This guide will show you how to enter a non-listed residential property as a comparable in the CRMLS Flexmls, Matrix, or Paragon systems.
Before proceeding, make sure you are familiar with Rule 10.2 Reporting of Sales and the corresponding Compliance Guidelines.
To access the listing input forms for your MLS system, click here.
Click here to jump to the Flexmls instructions.
Click here to jump to the Matrix instructions.
Click here to jump to the Paragon instructions.
Flexmls – Enter a Listing as a Comparable
Note: If you have registered a listing in the “Registered Listing portal,” no further actions in the portal are necessary. Proceed to Flexmls to enter the listing into the MLS.
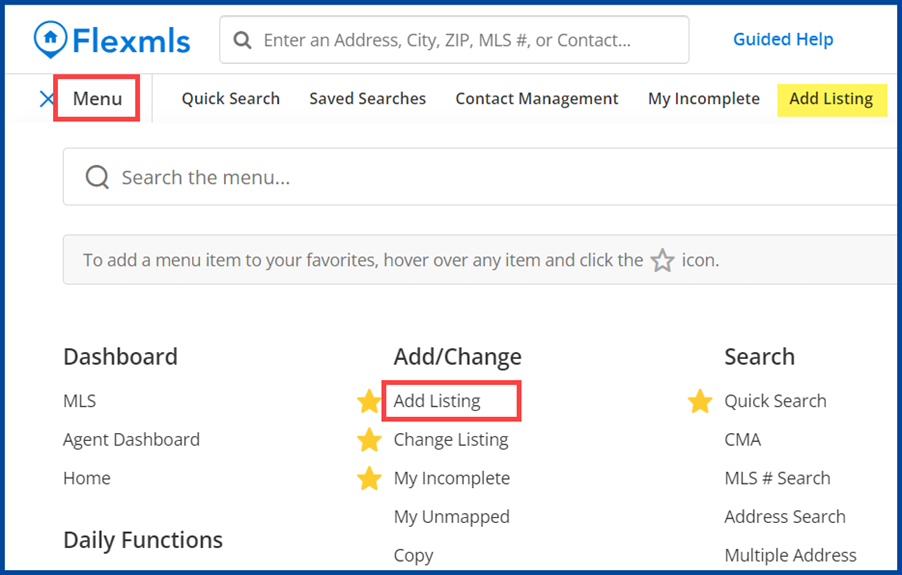
- Select Add Listing from your favorites bar or by clicking Menu and looking under the “Add/Change” section.
- Select the listing Property Type and enter the Listing Member Name or Short ID.
Note: You will enter your information as both the Listing Agent and the Buyer’s Agent.
- Enter the required Address fields and click Populate Tax Data.
- Validate the property location, move the map pin if necessary, and then click Use this location.
- Enter the listing status as Active.
- If you are using a Residential Purchase Agreement (RPA), follow these guidelines:
| MLS Listing Input Field | Residential Purchase Agreement |
| List Contract Date | Date RPA was signed and accepted |
| On Market Date | Date RPA was signed and accepted |
| Purchase Contract Date | Date RPA was signed and accepted |
| Expiration Date | Close of Escrow date |
If you are using a Single Party Compensation Agreement (SPCA), follow these guidelines:
| MLS Listing Input Field | Single Party Compensation Agreement (SPCA) |
| List Contract Date | Beginning date of SPCA |
| Expiration Date | Ending date of SPCA |
| Purchase Contract/Pending Date | Date that Residential Purchase Agreement was signed and accepted |
| Close of Escrow | Day of Close of Escrow |
- Continue entering all required and applicable fields in each tab.
Note: To display only the required listing input fields, click the drop-down arrow in the Show field located in the top right and select Required Fields Only.
- In Private Remarks you can enter an optional note, such as “Entered for comp purposes.”
- When the listing information is entered, click the Add Listing button to publish the listing.
Add Photo(s)
Even for comps, you are required to have at least one (1) photo of the property’s exterior.
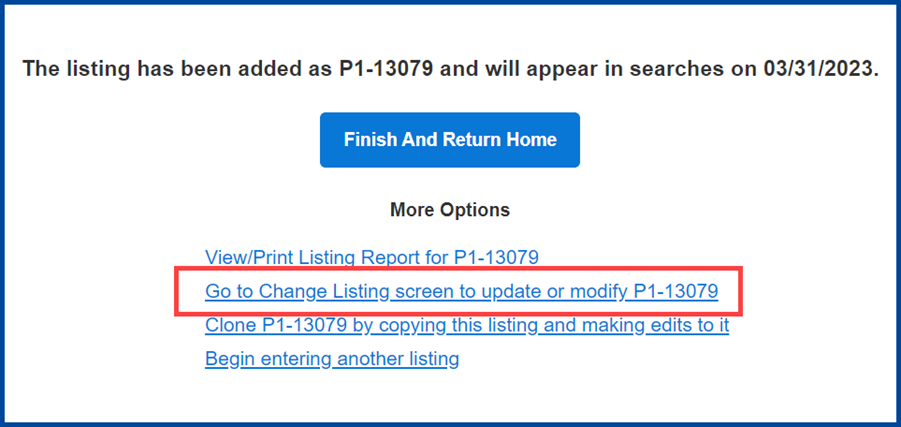
From the confirmation page, click on Go to Change Listing screen to update or modify (the listing number).
- Under the “Media” section, select Photos.
- Click Add.
- Select the photo(s) from your computer and include an optional label or description.
- A green “Save Complete” message will appear confirming that Flexmls has autosaved the photos. Click Return to edit your listing to immediately change your listing status to Closed.
Change Status to Sold
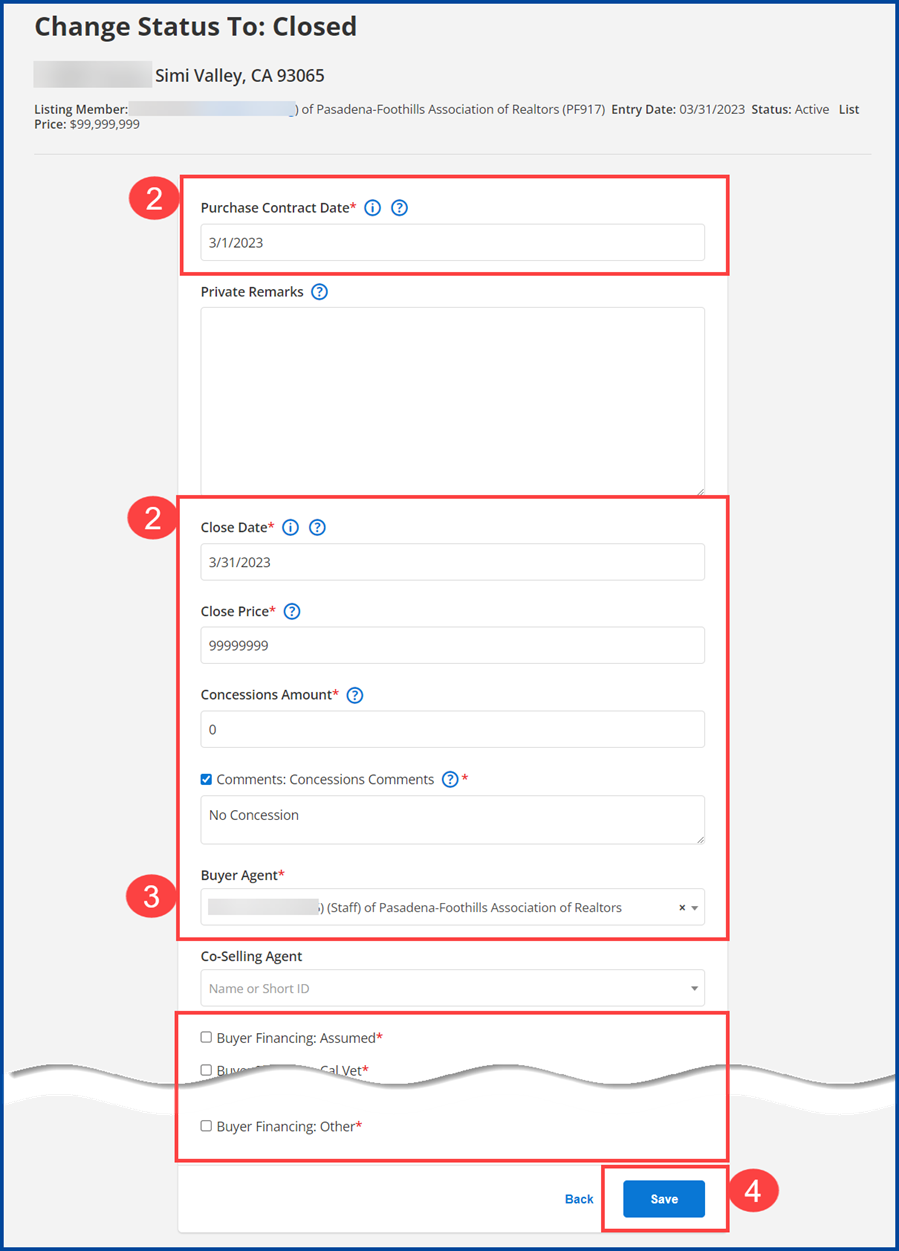
- Under the “Status” section, select Close Listing.
- Enter the Purchase and Close Dates, following the above guidelines, and all required and applicable fields.
- If you have not done so already, enter your agent information in the Buyer’s Agent field.
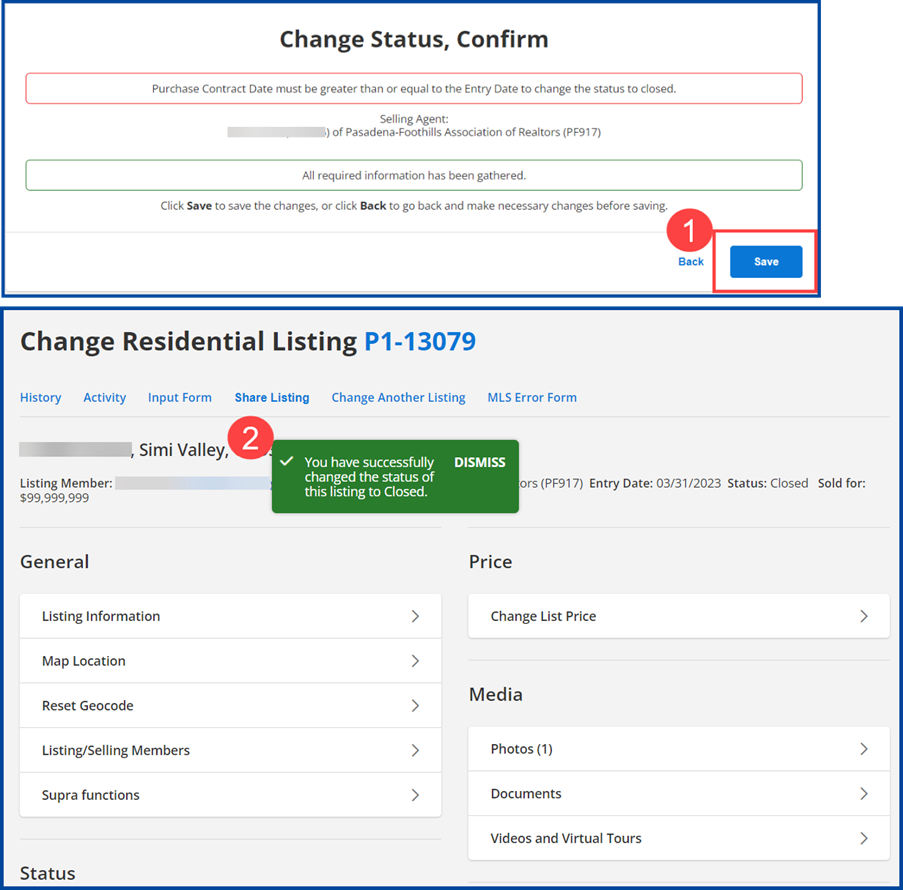
- When finished, click Save.
- Click Save to save the listing as Closed or Back to return and make necessary changes before saving.
- A message will confirm you have successfully changed the status of this listing to Closed.
Note: A comparable listing entry will show “zero” Days Active in MLS (DAM).
Keep in mind that the listing must be entered into the MLS within two (2) days after the Close of Escrow. An agent that only represented the buyer must contact their local Association or Board for further assistance after submitting the listing.
Only one comp for the property can be entered in the MLS. If a Listing Agent enters it, then the Buyer’s Agent cannot, and vice versa.
Matrix – Enter a Listing as a Comparable
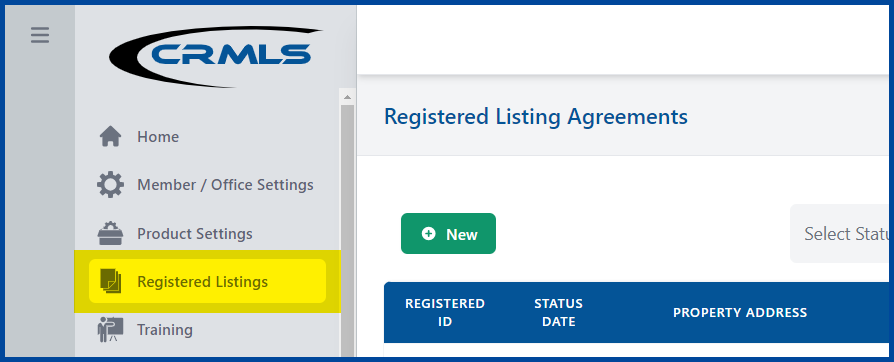
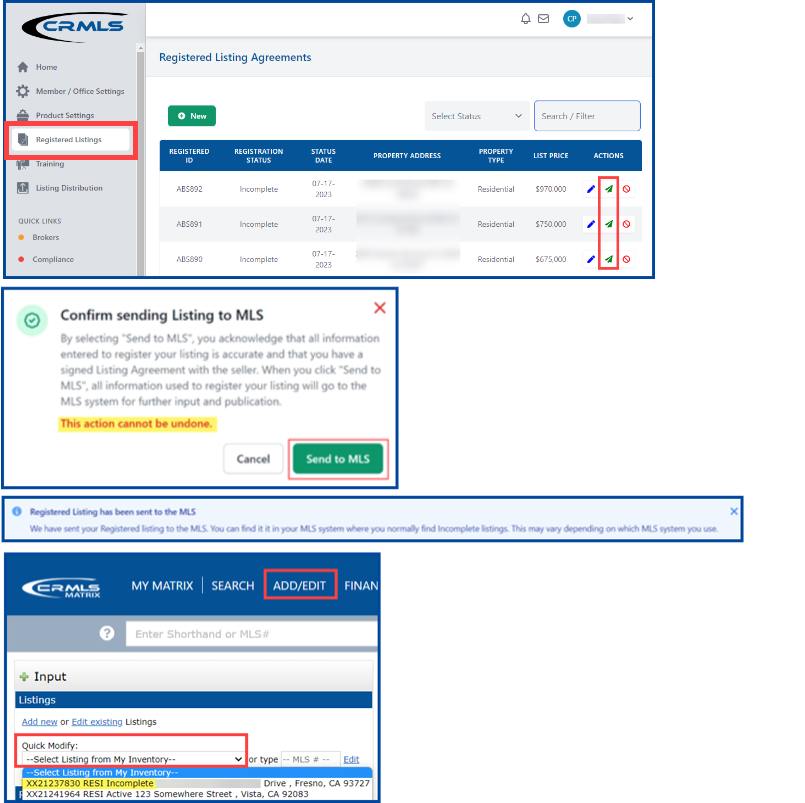
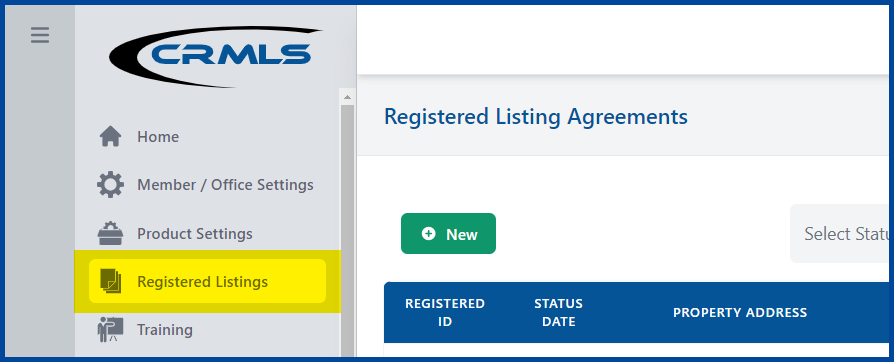
- If the listing you want to enter as a comp is already a Registered listing, start by clicking on Registered Listing from the left navigation panel of your dashboard. If the listing is not already Registered, start at Step 6.
- From the “Actions” column, click on the green arrow to the right of your listing and then click Send to MLS.
- A confirmation message will indicate the system has sent your Registered Listing to the MLS.
- In Matrix, click on the Add/Edit tab, and select your “Incomplete” listing from the Quick Modify field.
Note: It may take 20-30 minutes for the listing to transfer to Matrix.
Non-Registered Listings
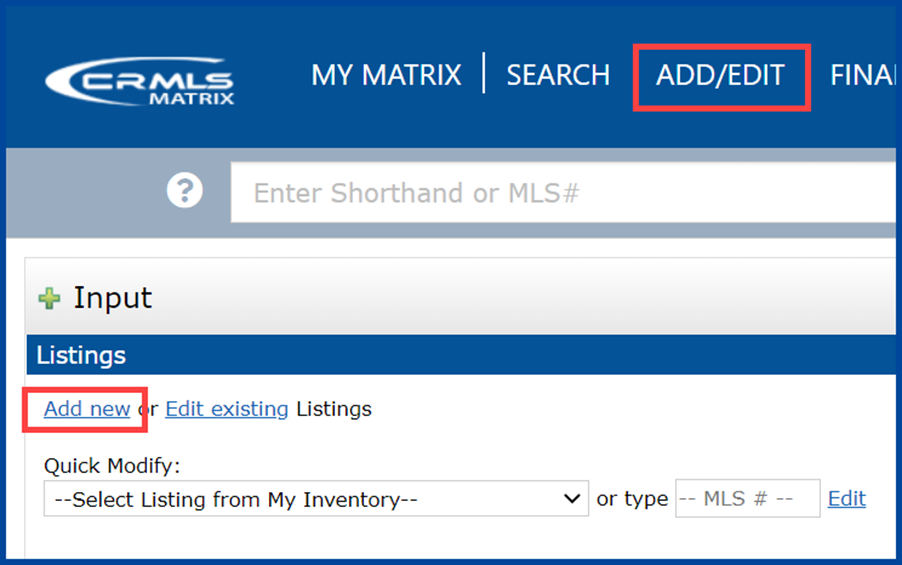
- To enter a non-Listed and non-Registered property in the MLS for comparable purposes, start by clicking on the Add/Edit tab, and click Add New.
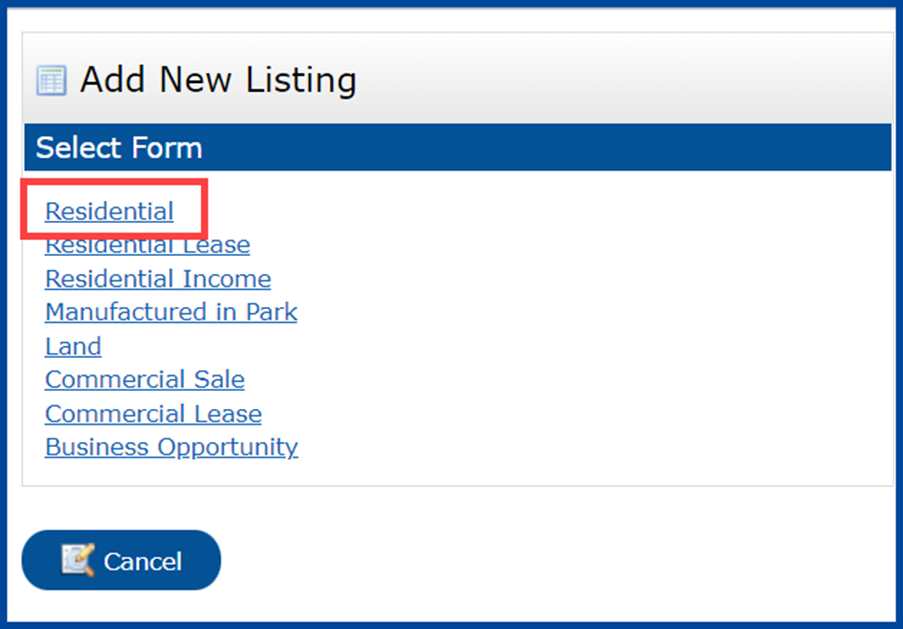
- Select the applicable form. For this example, we have selected Residential.
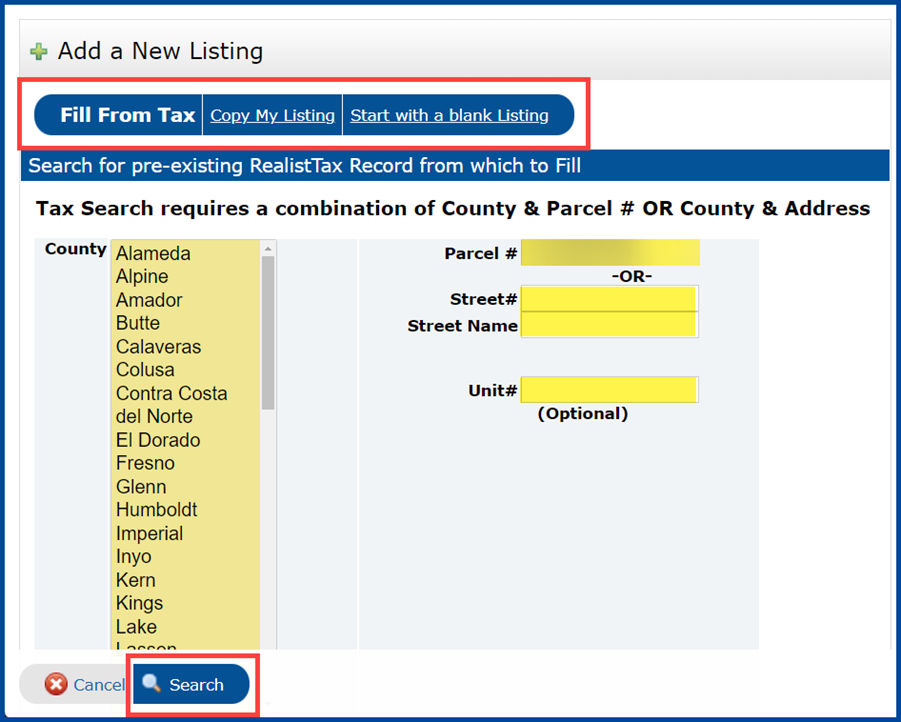
- Enter the listing using the Fill From Tax, Copy My Listing, or Start with a blank Listing option. In this example we are using the Fill From Tax option. Select the County/Parish, and then enter the Parcel # or Address and click Search.
- Click the Fill option to the left of the property. If you need to modify the search for pre-existing Realist Tax records, click Revise Search.
- Enter the listing status as Active.
- If you are using a Residential Purchase Agreement (RPA), follow these guidelines:
| MLS Listing Input Field | Residential Purchase Agreement |
| List Contract Date | Date RPA was signed and accepted |
| On Market Date | Date RPA was signed and accepted |
| Purchase Contract Date | Date RPA was signed and accepted |
| Expiration Date | Close of Escrow date |
If you are using a Single Party Compensation Agreement (SPCA), follow these guidelines:
| MLS Listing Input Field | Single Party Compensation Agreement (SPCA) |
| List Contract Date | Beginning date of SPCA |
| Expiration Date | Ending date of SPCA |
| Purchase Contract/Pending Date | Date that Residential Purchase Agreement was signed and accepted |
| Close of Escrow | Day of Close of Escrow |
- Enter your information as the Listing Agent and the Buyer’s Agent.
- Continue entering all required and applicable fields in each tab.
- In Private Remarks you can enter an optional note, such as “Entered for comp purposes.”
- When finished, click Submit Listing.
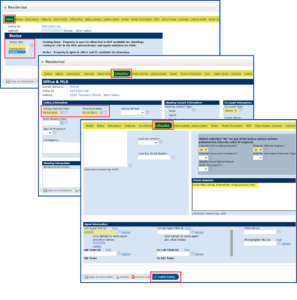
You will see the “Input Succeeded” screen, confirming that the listing has been added and has a Listing ID.
Add Photo(s)
- Even for comps, you are required to have at least one (1) photo of the property’s exterior. Select Add/Edit Photo to upload photos. When finished, click Certify and Save.
- Make any additional edits to your listing, and when finished, immediately change the listing status to Closed.
Change Status to Sold
- Next, click on the Add/Edit
- Select your listing from the Quick Modify field.
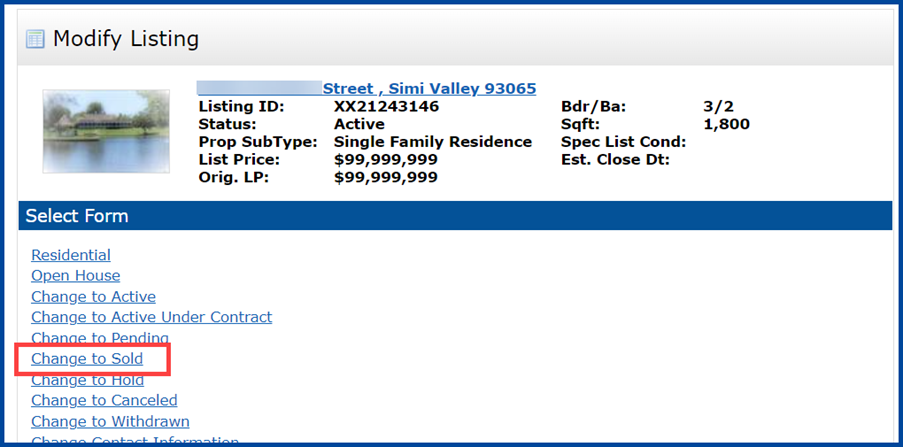
- Select Change to Sold.
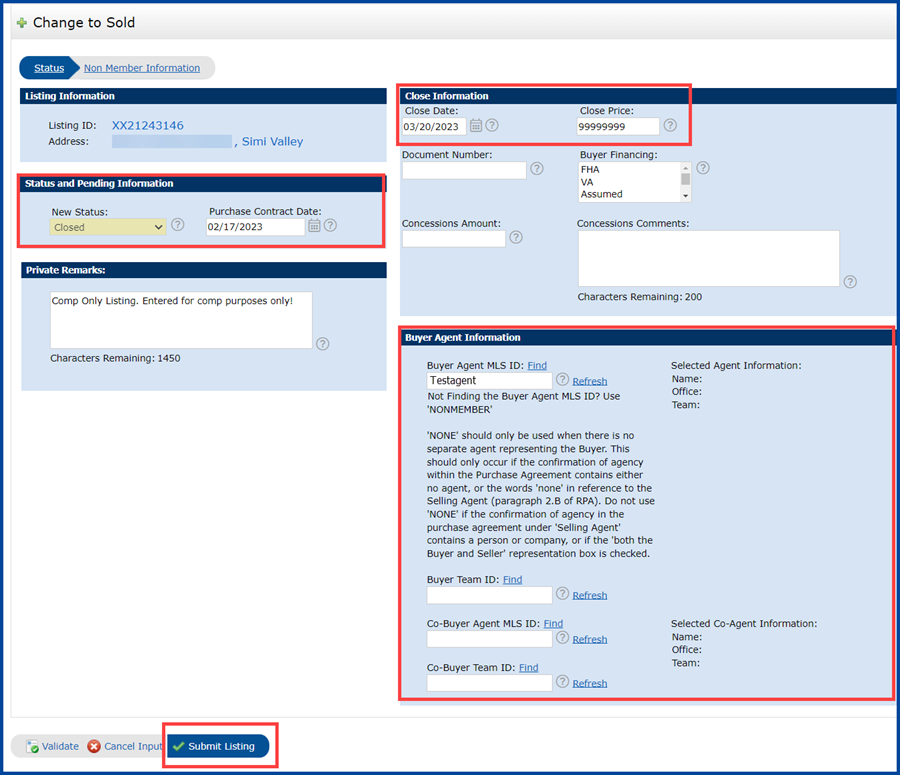
- If you have not done so already, enter your agent information in the Buyer’s Agent field.
- Enter the Purchase and Close Dates, following the above guidelines, and all required and applicable fields.
Note: A comparable listing entry will show “zero” Days Active in MLS (DAM).
Keep in mind that the listing must be entered into the MLS within two (2) days after the Close of Escrow. An agent that only represented the buyer must contact their local Association or Board for further assistance after submitting the listing.
Only one comp for the property can be entered in the MLS. If a Listing Agent enters it, then the Buyer’s Agent cannot, and vice versa.
Paragon – Enter a Listing as a Comparable
Note: If you have registered a listing in the “Registered Listing portal,” no further actions in the portal are necessary. Proceed to Paragon to enter the listing into the MLS.
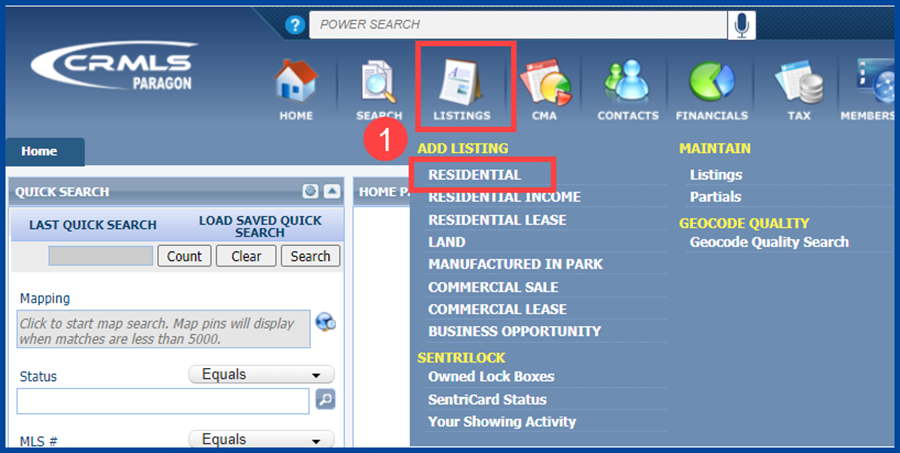
- Start by clicking on the Listings Under the “Add Listing” menu, select the property type. For this example, we have selected Residential.
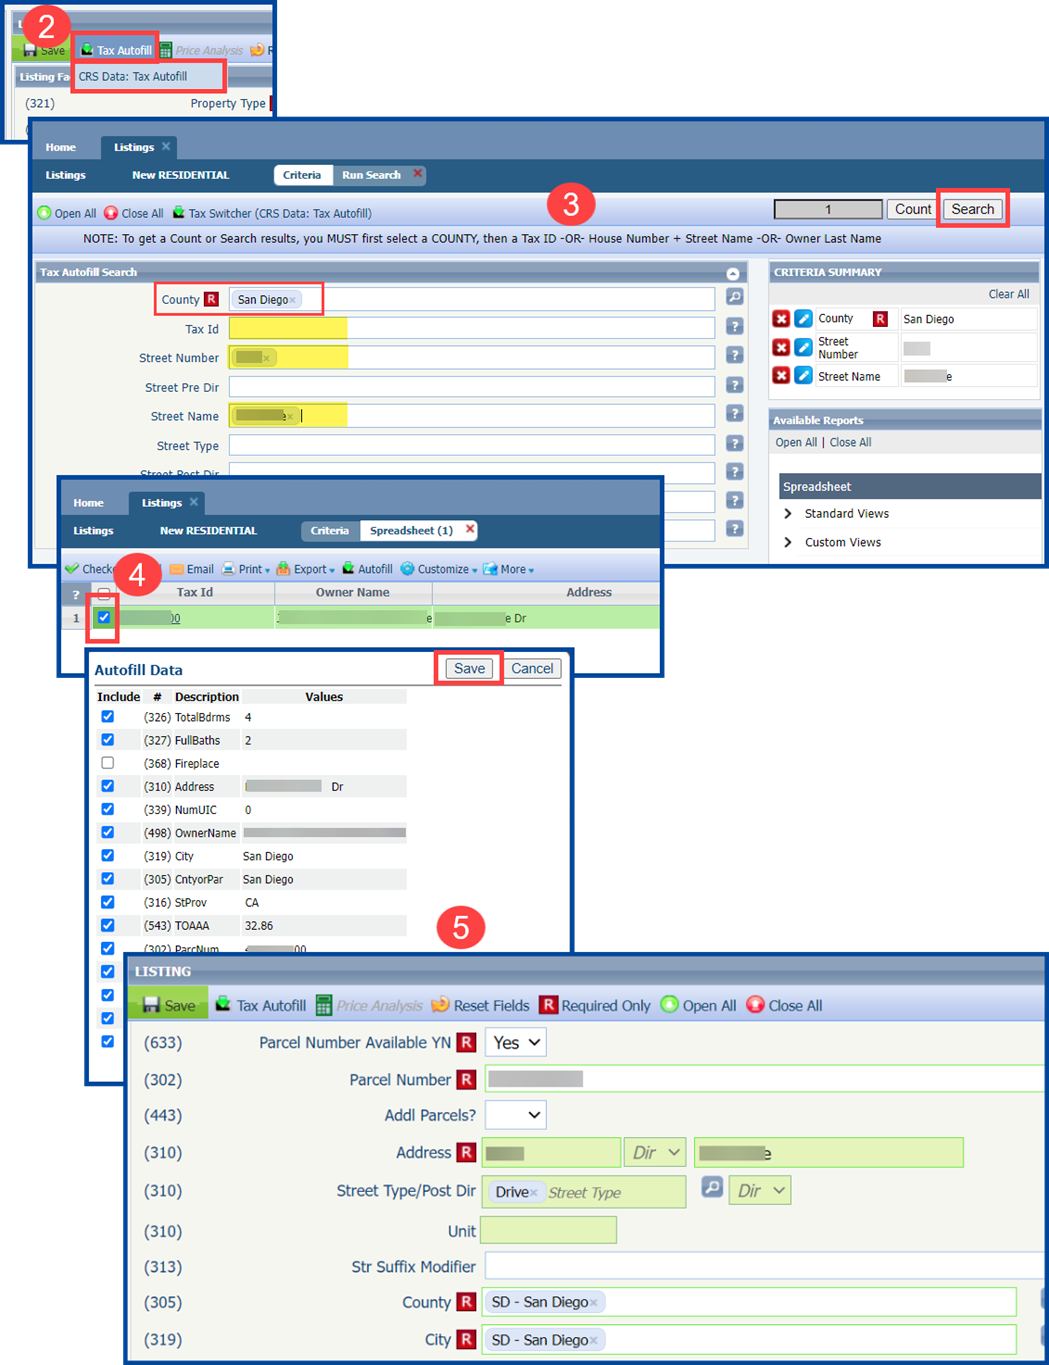
- Hover over Tax Autofill and select CRS Data: Tax Autofill to add several data fields from public records or enter the information manually. For this example, we have selected “Tax Autofill.”
- Enter the required County field, and then enter either
- the Tax ID, or
- the Street Number and Street Name fields, then click Search. For this example, we have selected the Street Number and Street Name.
- Verify that the property displayed on the spreadsheet is correct, and then checkmark the box to the left of that listing.
- The Autofill Data box will pop up. Any info with a blue check next to it will be added to the listing. Select Save to add that data. You should see a green outline indicating fields that were populated with tax autofill data on the listing input template.
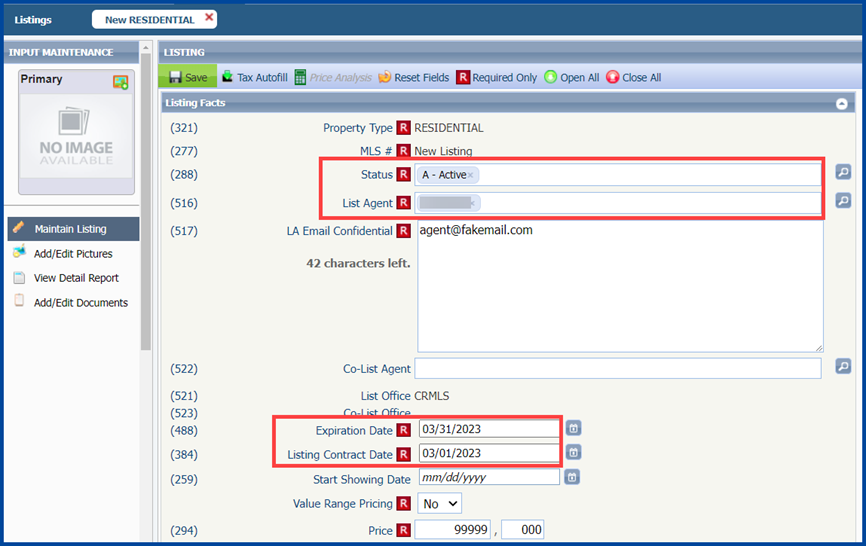
- Enter the listing status as Active.
- Your name will display in the List Agent field.
- If you are using a Residential Purchase Agreement (RPA), follow these guidelines:
| MLS Listing Input Field | Residential Purchase Agreement |
| List Contract Date | Date RPA was signed and accepted |
| On Market Date | Date RPA was signed and accepted |
| Purchase Contract Date | Date RPA was signed and accepted |
| Expiration Date | Close of Escrow date |
If you are using a Single Party Compensation Agreement (SPCA), follow these guidelines:
| MLS Listing Input Field | Single Party Compensation Agreement (SPCA) |
| List Contract Date | Beginning date of SPCA |
| Expiration Date | Ending date of SPCA |
| Purchase Contract/Pending Date | Date that Residential Purchase Agreement was signed and accepted |
| Close of Escrow | Day of Close of Escrow |
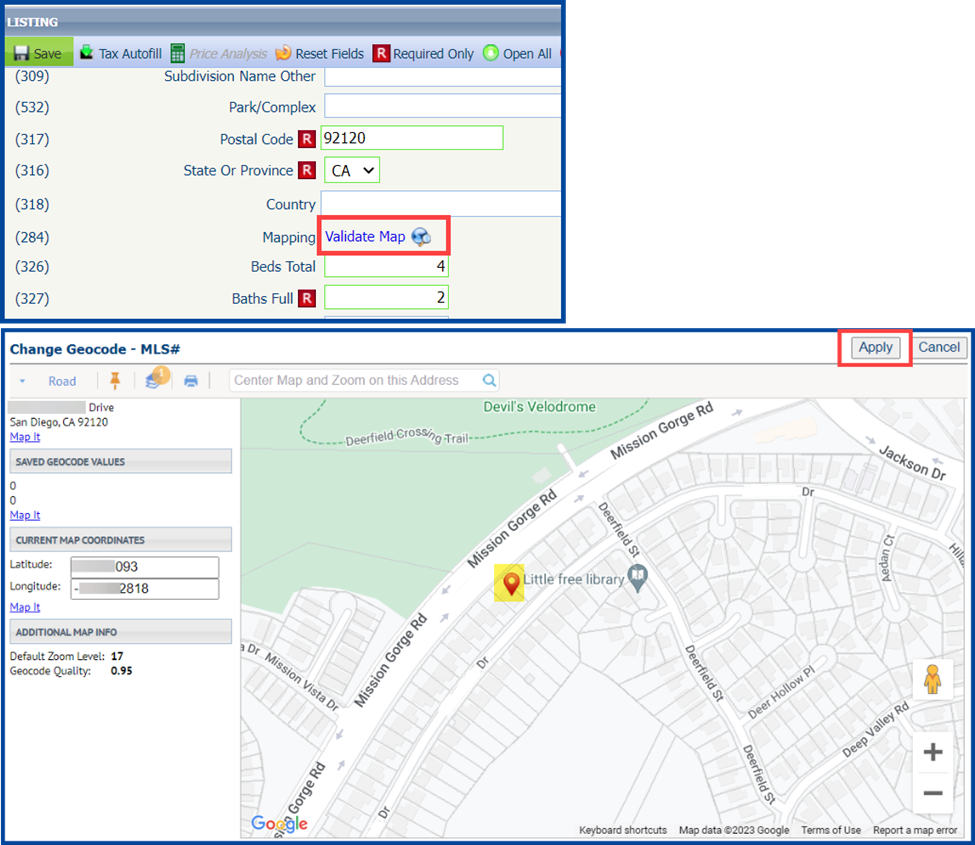
- Click on Validate Map to ensure the property location is pinned correctly on the Map; move the pin if necessary. When the pin is accurate, select Apply.
- Continue entering all required and applicable fields in each section.
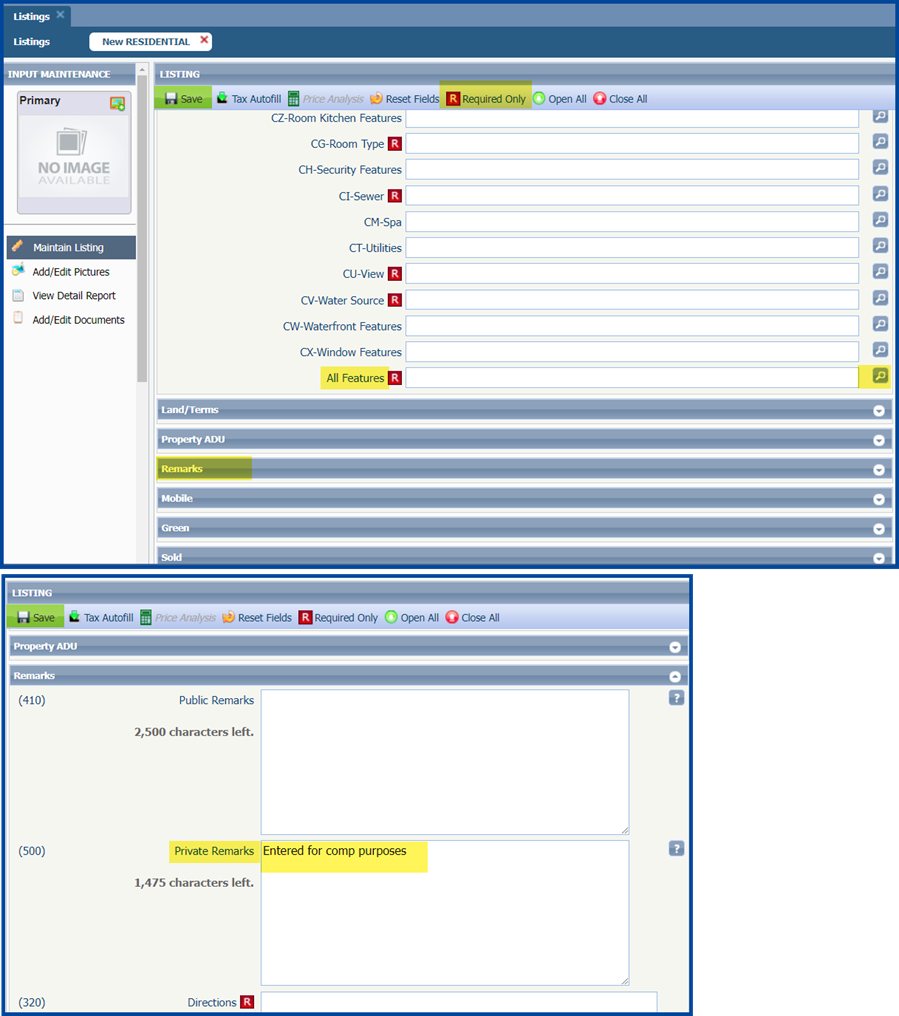
Tip: When you are entering “Features,” scroll down to the “All Features” field, click the magnifying glass, and go through the list, checking all required and applicable features. To show only the required listing input fields, click the “Required Only” button in the tool bar along the top.
- In Private Remarks you can enter an optional note, such as “Entered for comp purposes.”
Add Photo(s)
Even for comps, you are required to have at least one (1) photo of the property’s exterior.
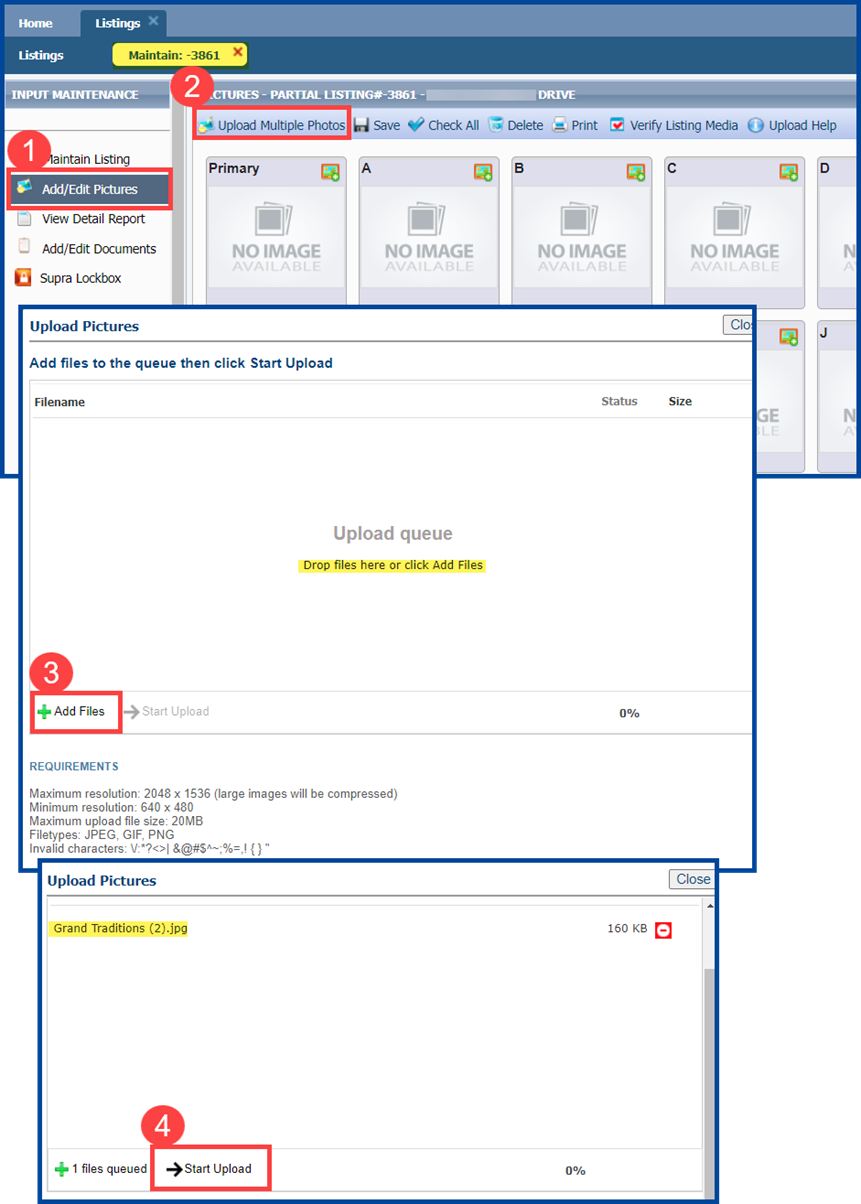
- Select Add/Edit Pictures on the left. This will autosave the listing as a “Partial Listing” and assign a partial listing number.
- Click Upload Multiple Photos.
- Click the + Add Files button, or drag and drop the file(s) from your computer.
- When you’ve added the file(s) to the queue, click Start Upload.
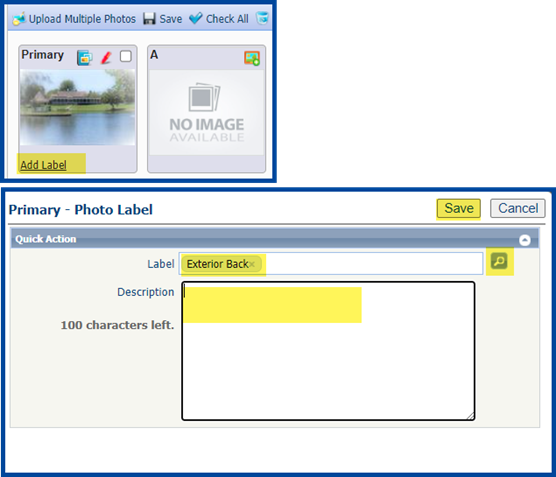
Note: To add labels or descriptions, click Add Label, then click on the magnifying glass to add an optional label, and/or add a “Description.” Click Save to keep these changes.
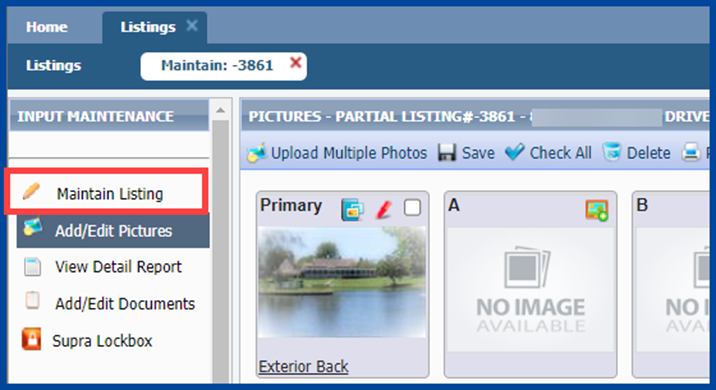
- Click Maintain Listing to return to the listing input form.
- Make sure “Active” is selected in the “Status” field.
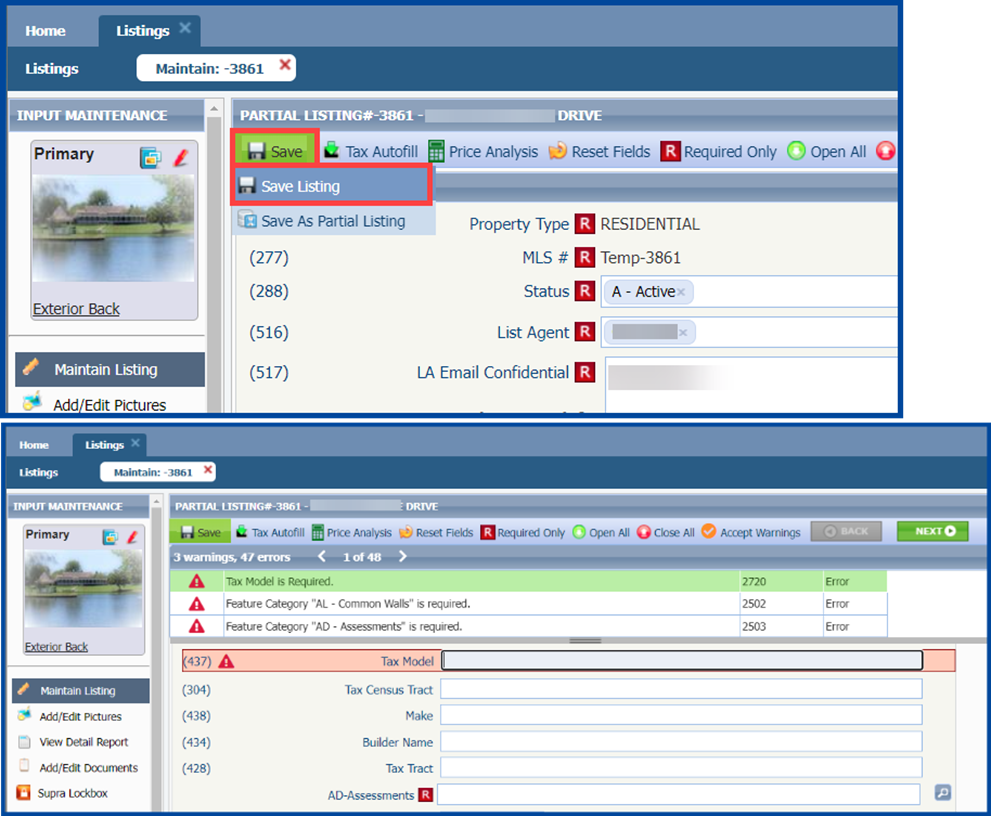
- Hover your cursor over “Save” and select Save Listing from the dropdown to publish the listing. If you see any warnings or errors displayed, go back to the listing and make corrections, then select Save Listing again.
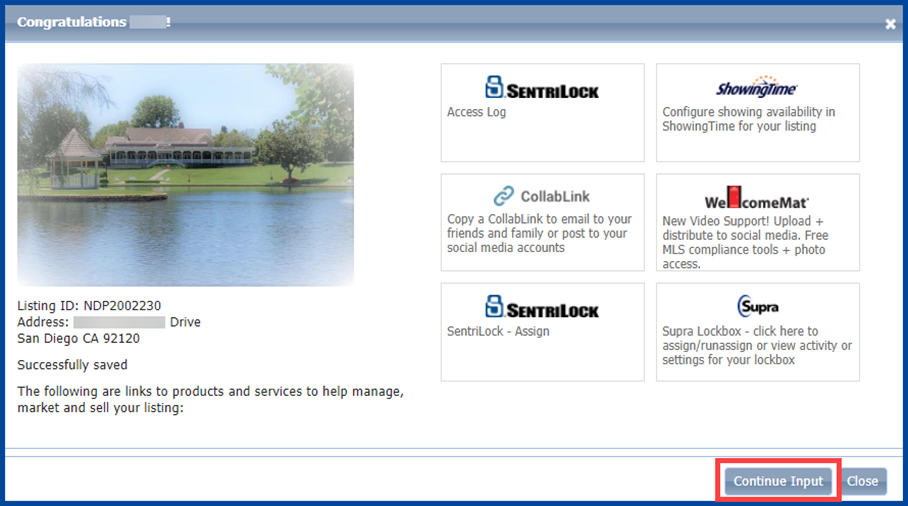
- A confirmation box saying “Congratulations,” will display with the Listing ID when it is successfully published.
Change Status to Sold
- From the “Congratulations” message, select Continue Input.
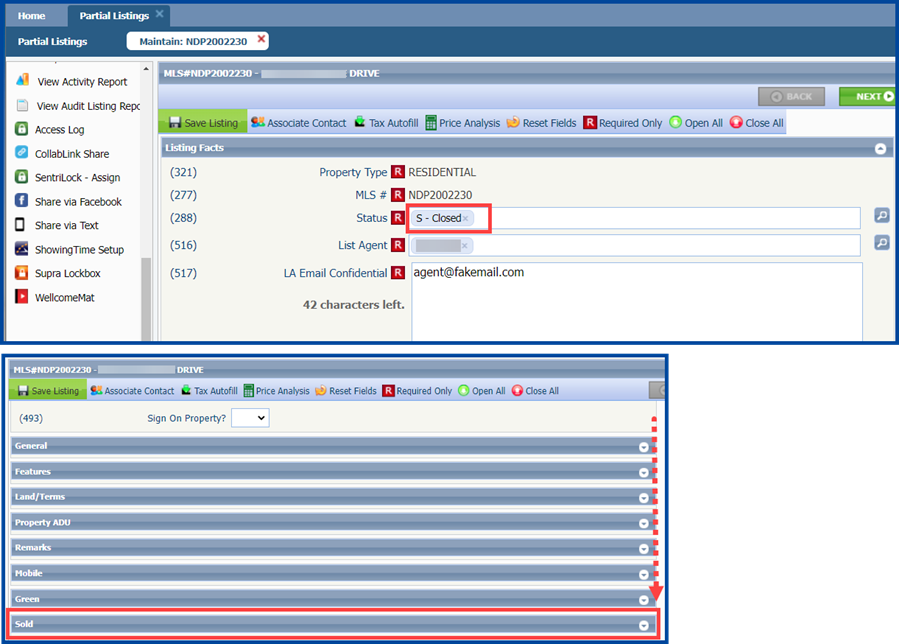
- Change the “Status” field to Closed.
- Scroll down and open the Sold section.
- Enter the Purchase and Close Dates, following the above guidelines, and all required and applicable fields.
- If you have not done so already, enter your agent information in the Buyer’s Agent field.
- When finished, click Save Listing.
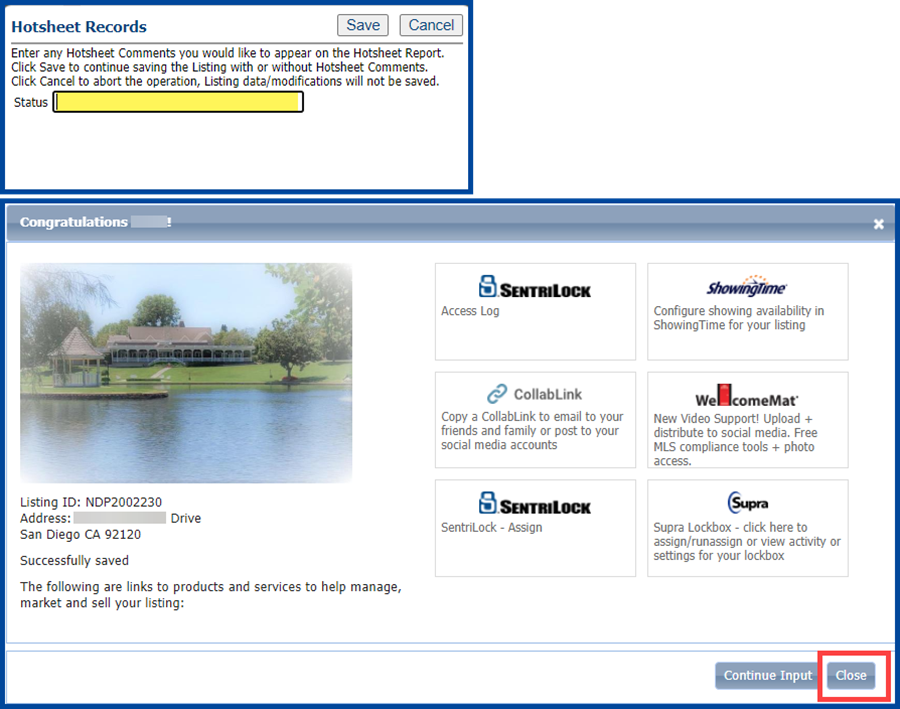
- Enter optional status information in the “Hotsheet Records” window, and click Save or Cancel to exit the screen.
- The “Congratulations” confirmation message will display again. Select Close to exit the screen.
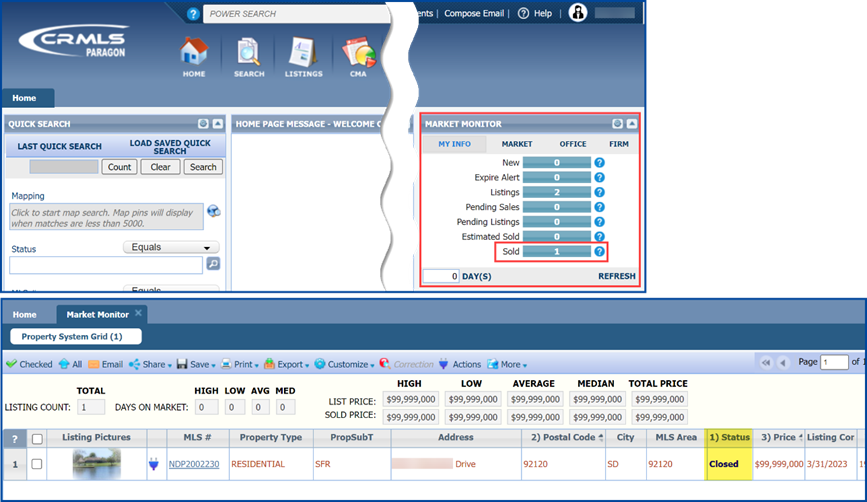
- From the Home page you can quickly verify that the listing is Closed by clicking on the My Info tab in “Market Monitor” and then on the number in the Sold section.
- You should see your comp listing with “Closed” in the “Status” column of the spreadsheet.
Note: a comparable listing entry will show “zero” Days Active in MLS (DAM).
Keep in mind that the listing must be entered into the MLS within two (2) days after the Close of Escrow. An agent that only represented the buyer must contact their local Association or Board for further assistance after submitting the listing.
Only one comp for the property can be entered in the MLS. If a Listing Agent enters it, then the Buyer’s Agent cannot, and vice versa.
Click here for more information on Registered Listings.
Chat live with a Compliance Analyst Monday – Friday, from 8:30am – 4pm. Access the CRMLS Rules & Policies anytime you need.
